
Loading...
Loading...
Loading...
Loading...
Loading...
Loading...
Loading...
Loading...
Loading...
Loading...
Loading...
Loading...
Loading...
Loading...
Loading...
Loading...
Loading...
Loading...
Loading...
Loading...
Loading...
Loading...
Loading...
Loading...
Loading...
Loading...
Loading...
Loading...
Loading...
Loading...
Loading...
Loading...
Loading...
Loading...
Loading...
Loading...
Loading...
Loading...
Loading...
Loading...
Loading...
Loading...
Loading...
Loading...
Loading...
Loading...
Loading...
Loading...
Loading...
Loading...
Loading...
Loading...
Loading...
Loading...
Loading...
Loading...
Loading...
Loading...
Loading...
Loading...
Loading...
Loading...
Loading...
Loading...
Loading...
Loading...
Loading...
Loading...
Loading...
Loading...
Loading...
Loading...
Loading...
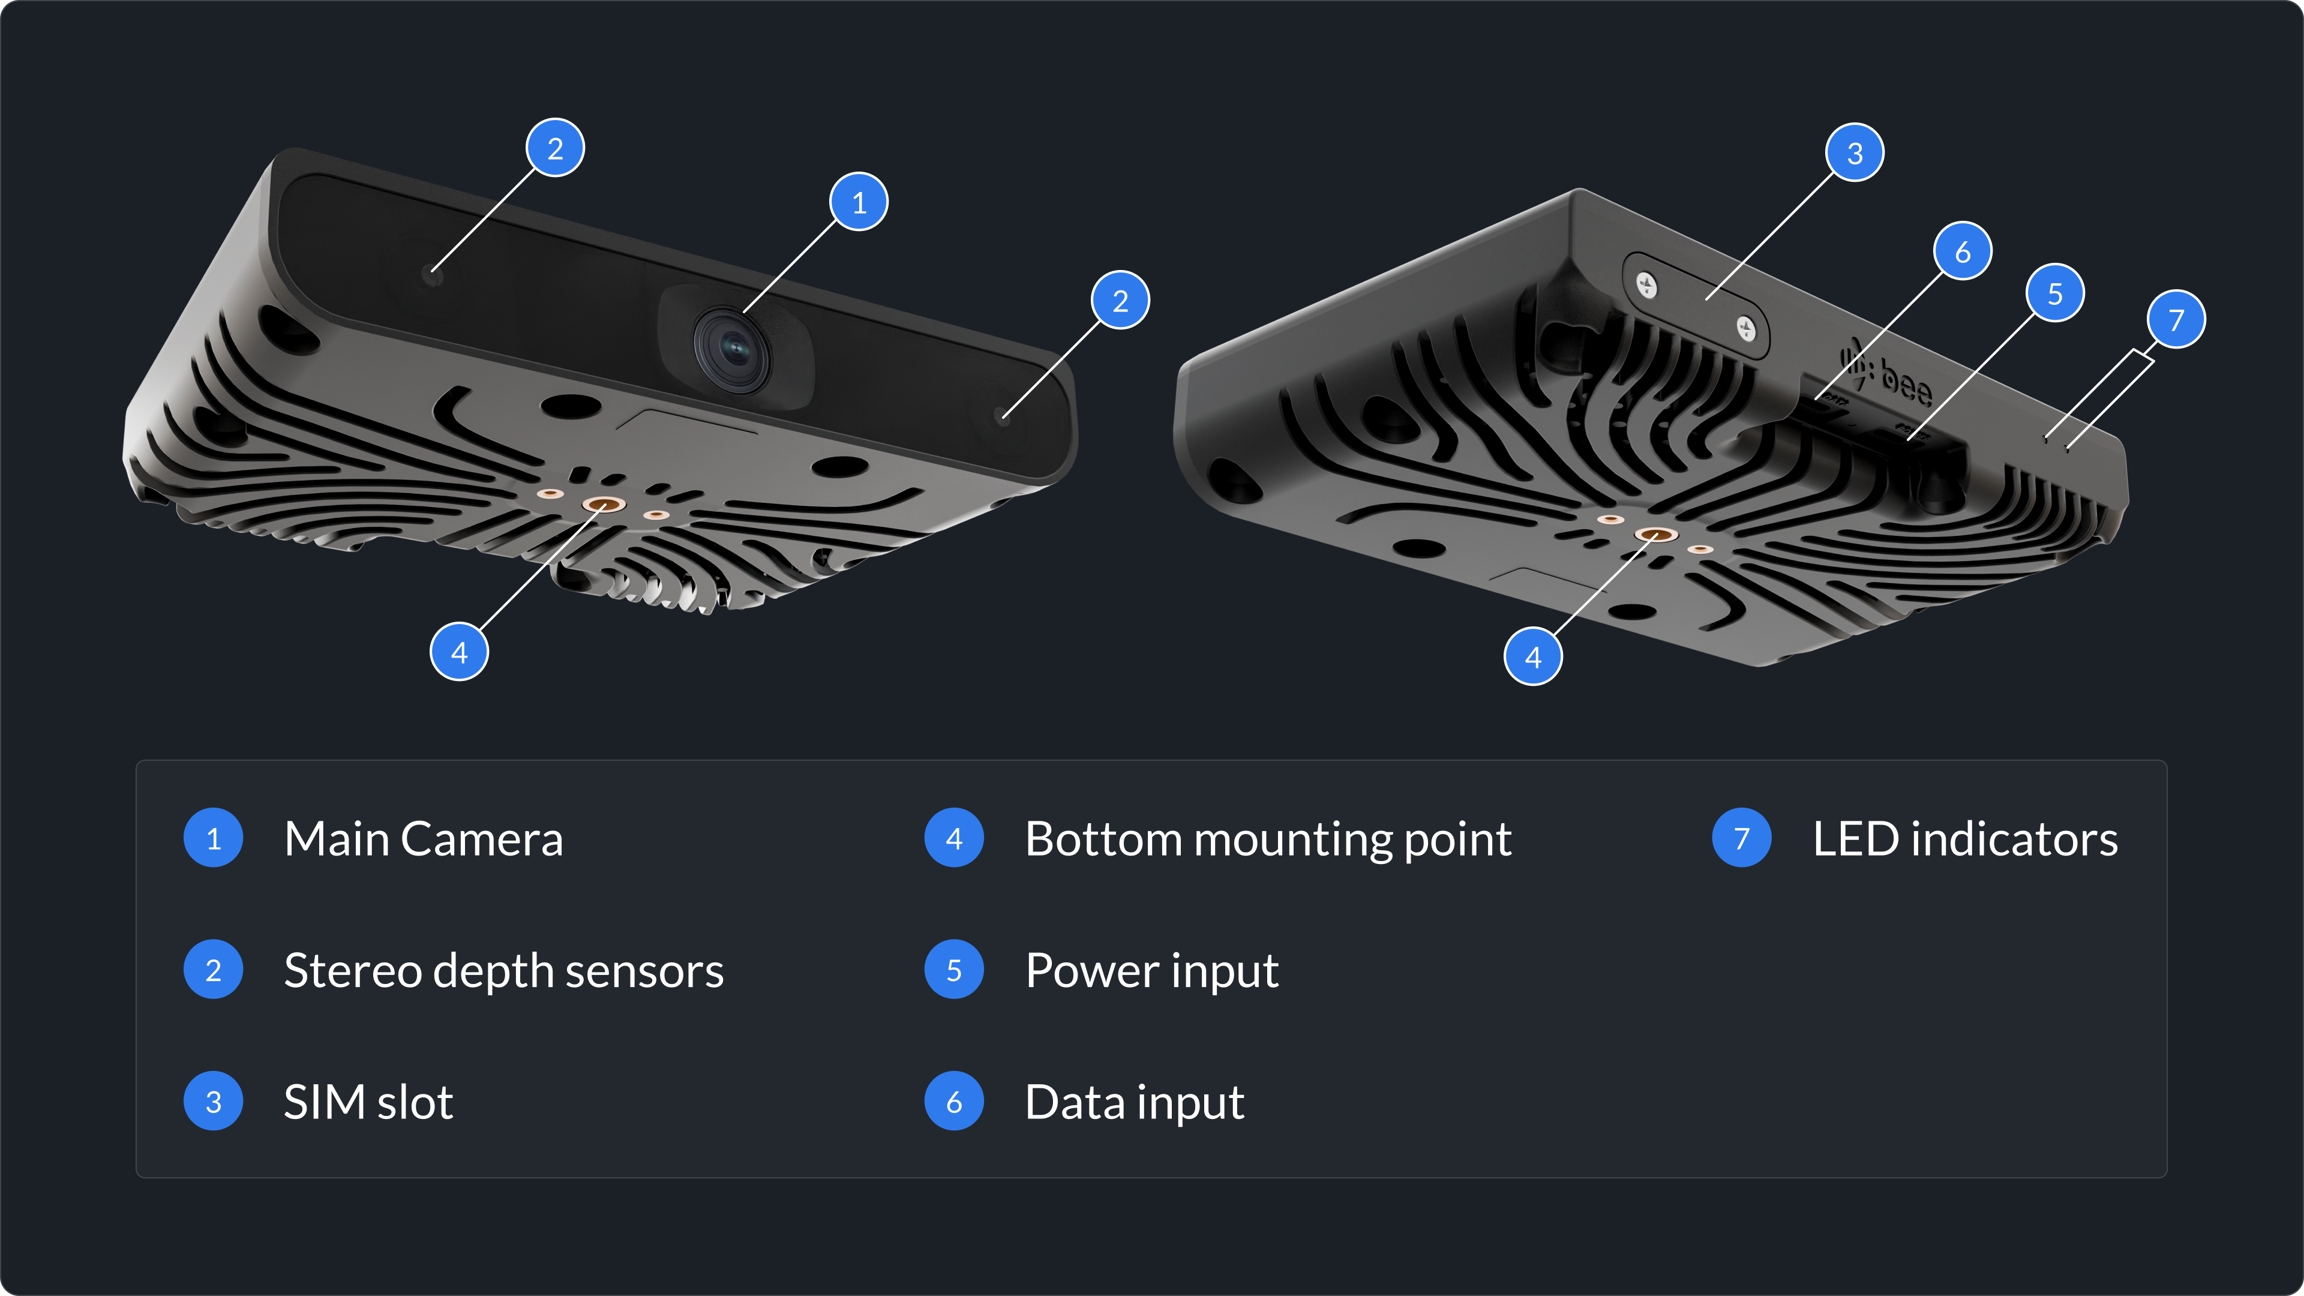
The Bee is an intelligent camera device that is mounted in vehicles. It looks like a dashcam, but inside it is far more than a dashcam. The Bee supports three main use cases.
Commercial Fleet
Essential pillar of for commercial fleets.
Maps are one of the most critical pieces of infrastructure for human society and the global economy.
around the world use mapping apps every day. Millions of organizations, from businesses to government agencies, rely on mapping APIs and services to support their operations. With every year that passes, more and more of the world's 1.5 billion vehicles use advanced technology features that demand richer map data than ever before.
Analysts estimate the mapping industry has a market size of, including mapping apps and APIs, geospatial analytics, GIS, and map data collection.
But there's a problem.
Most of today's maps are built by deploying dedicated vehicles to collect high-quality, street-level imagery. That's expensive, so mapmaking is consolidated among the few companies with the capital to map roads at global scale. It means maps often don't reflect current realities on the ground.
And yet, most roads are driven every day. In the United States alone, 3.26 trillion miles in 2022, or 8.9 billion miles per day. So why can’t ordinary people, and ordinary cars, collect map data?
Get your Bee ready to go by assembling the unit, inserting your SIM, and mounting it securely.
Pick the option that matches what you’re trying to do. Each one takes you directly to the right section.
Launched in 2022, Hivemapper is an open, decentralized global mapping network. Instead of relying on dedicated mapping fleets, it turns everyday driving into fresh, street-level map data.
At the core is Map AI. It is a purpose-built AI native mapping engine to transform streams of road imagery into structured map data that is used by autonomous robotaxis, logistic companies, and mapping companies.
Map AI detects changes, interprets road features, identifies restrictions, and continuously updates the network with real-world accuracy at global scale. Every week, it processes millions of kilometers of imagery into fresh, usable map intelligence.
Uneven coverage and freshness - Typical methods of collecting map data are very expensive, so even the best-funded companies struggle to refresh maps at global scale.
Fresher maps for autonomous and ADAS driving - Today's maps were made for humans. The maps required by autonomous and semi-autonomous vehicles require far fresher data.
Expensive for businesses - Millions of businesses pay to integrate maps into their products. With so few choices for reliable maps, monopoly pricing makes map data unaffordable.
Today's maps don't understand the "why" - When cars start to travel at 10 mph on a road they normally travel at 40 mph, modern maps don't know if this is due to road construction, a minor fender-bender or a severe crash that will take hours to clear. Even when a user reports an issue through an app, they cannot immediately trust the report without imagery.
The documentation in this repository is intended to help people learn about Bee Maps products and learn how to use them. If you can’t find the answers you need, contact us at [email protected].
Thank you for being a part of the future of maps.
– The Bee Maps Team
Mapping
Collects and builds a real-time global map for the Hivemapper Network.
Edge AI
A developer platform for change detection and running edge based spatial AI.
Before you begin, check that you have all parts listed above.
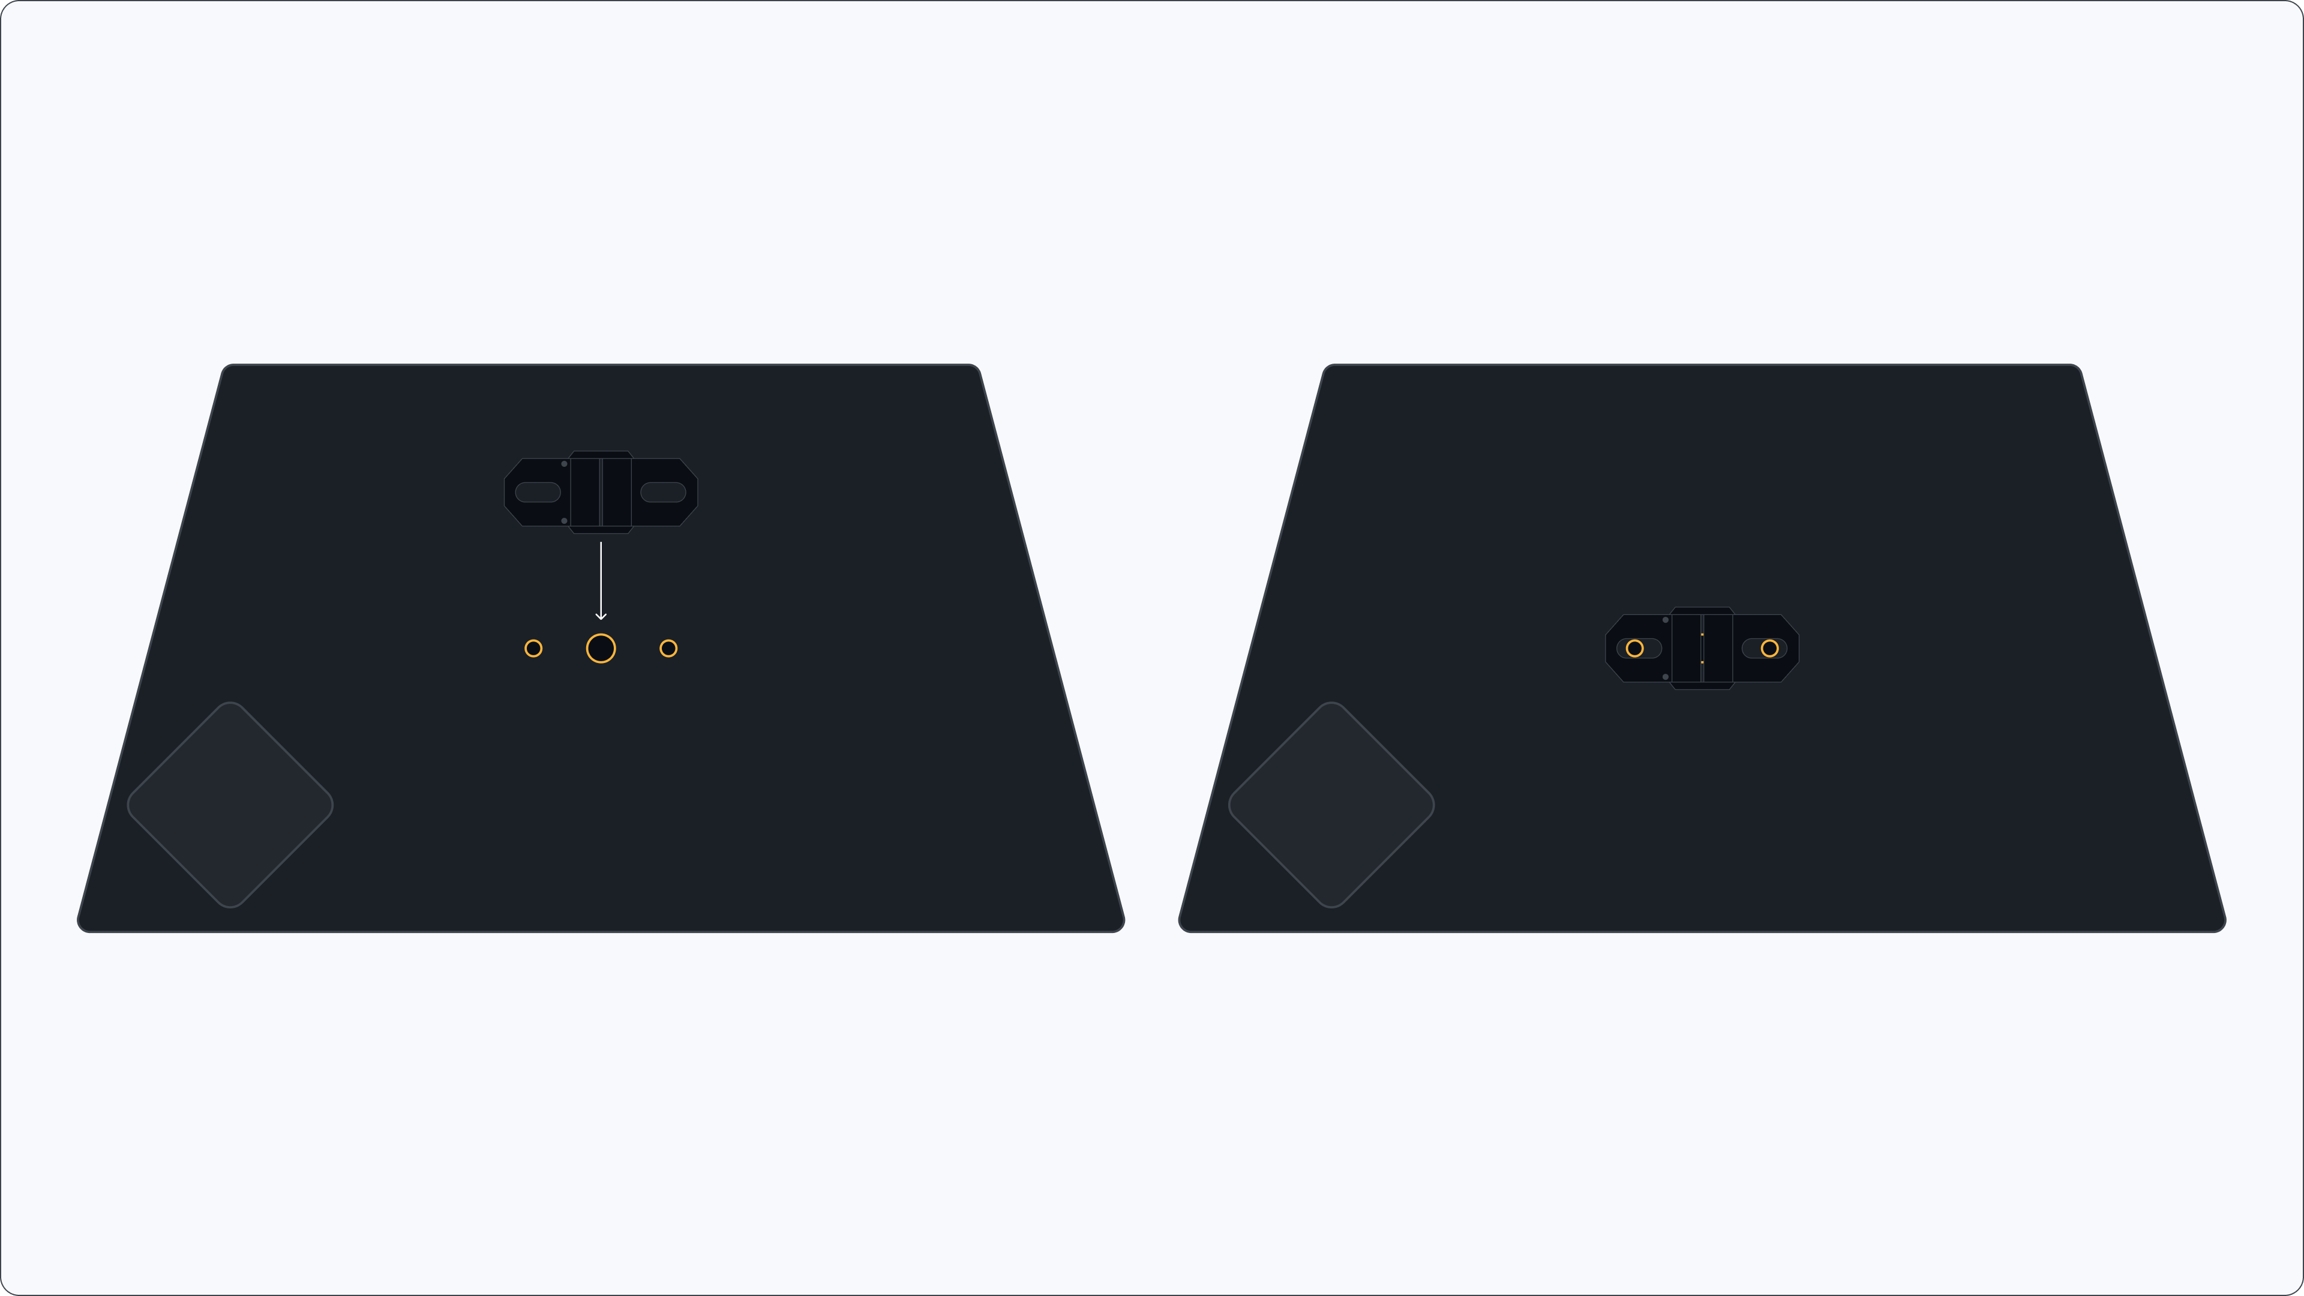
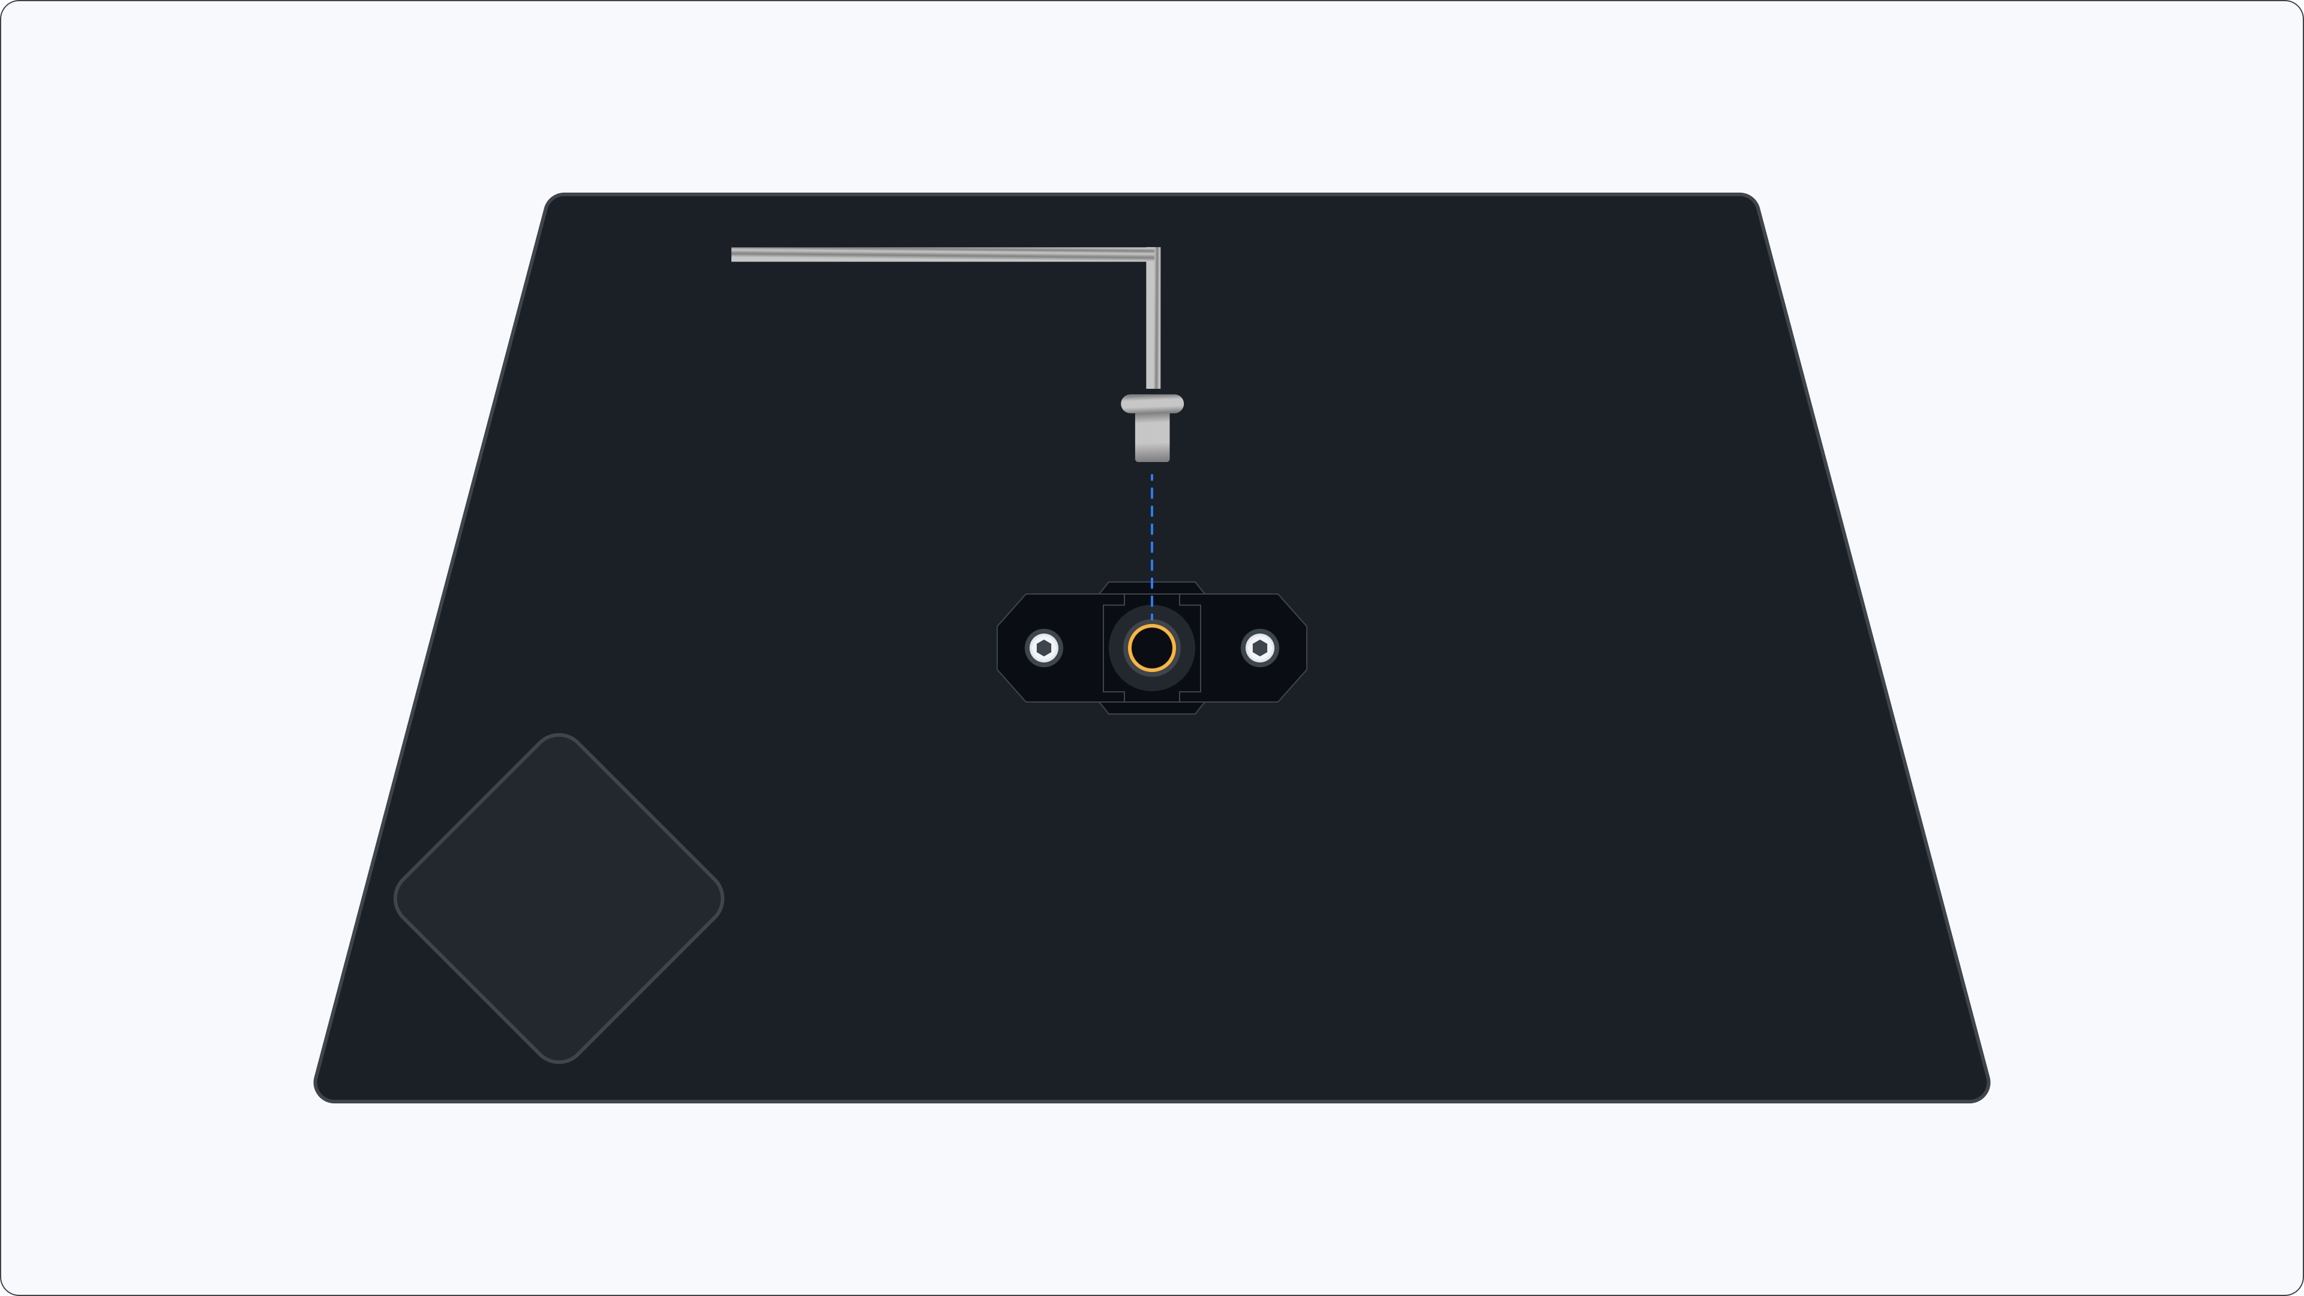
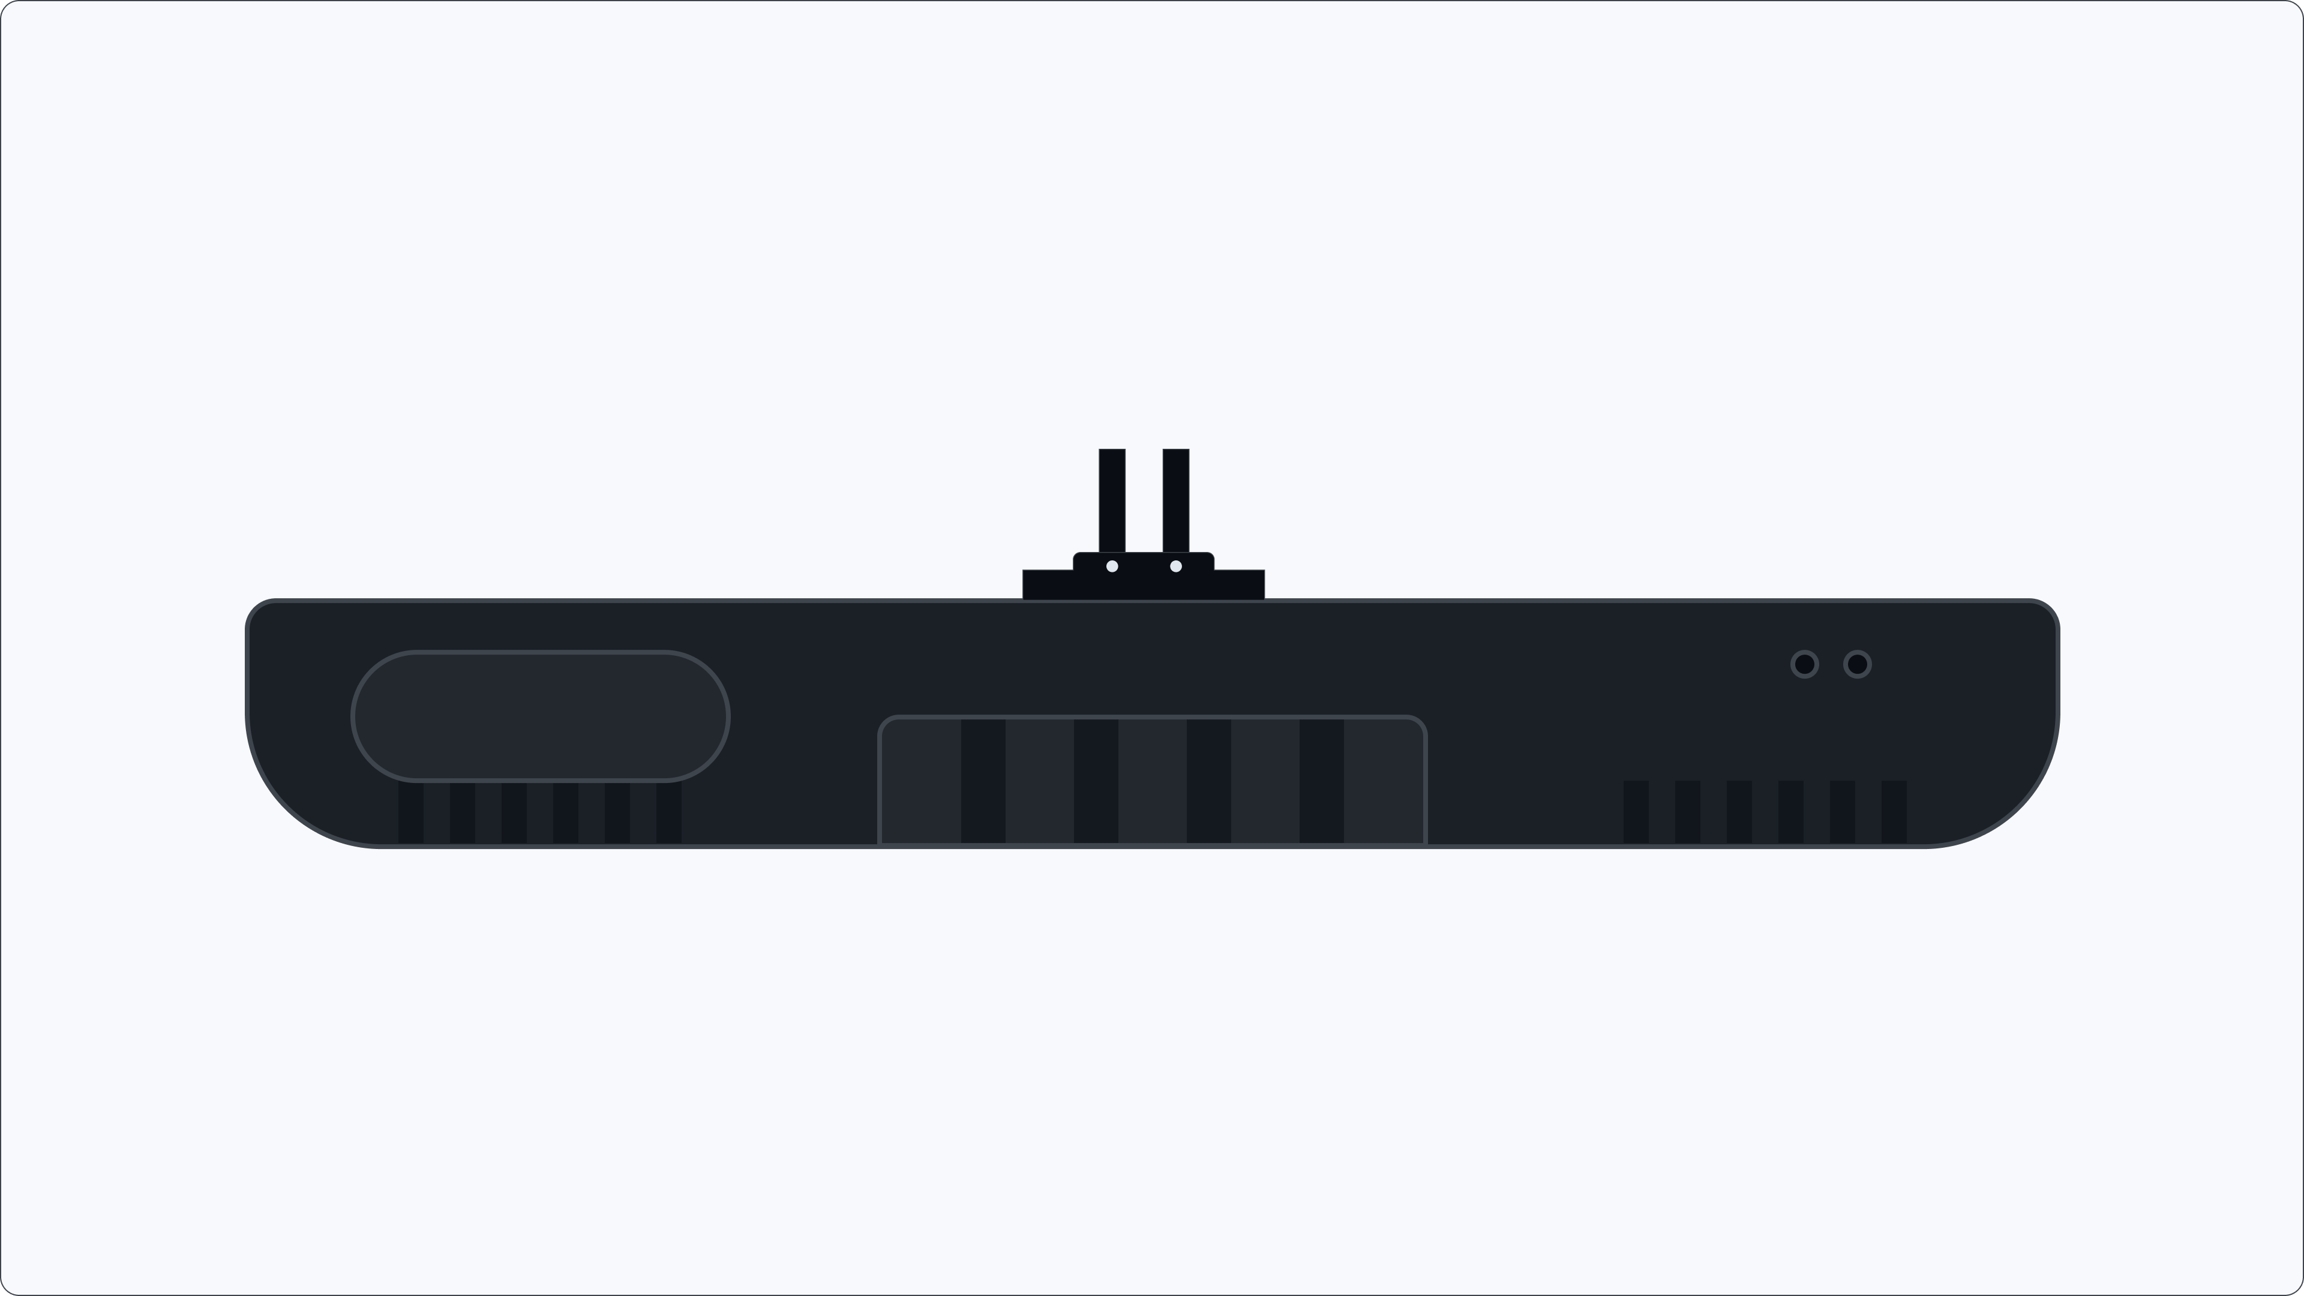
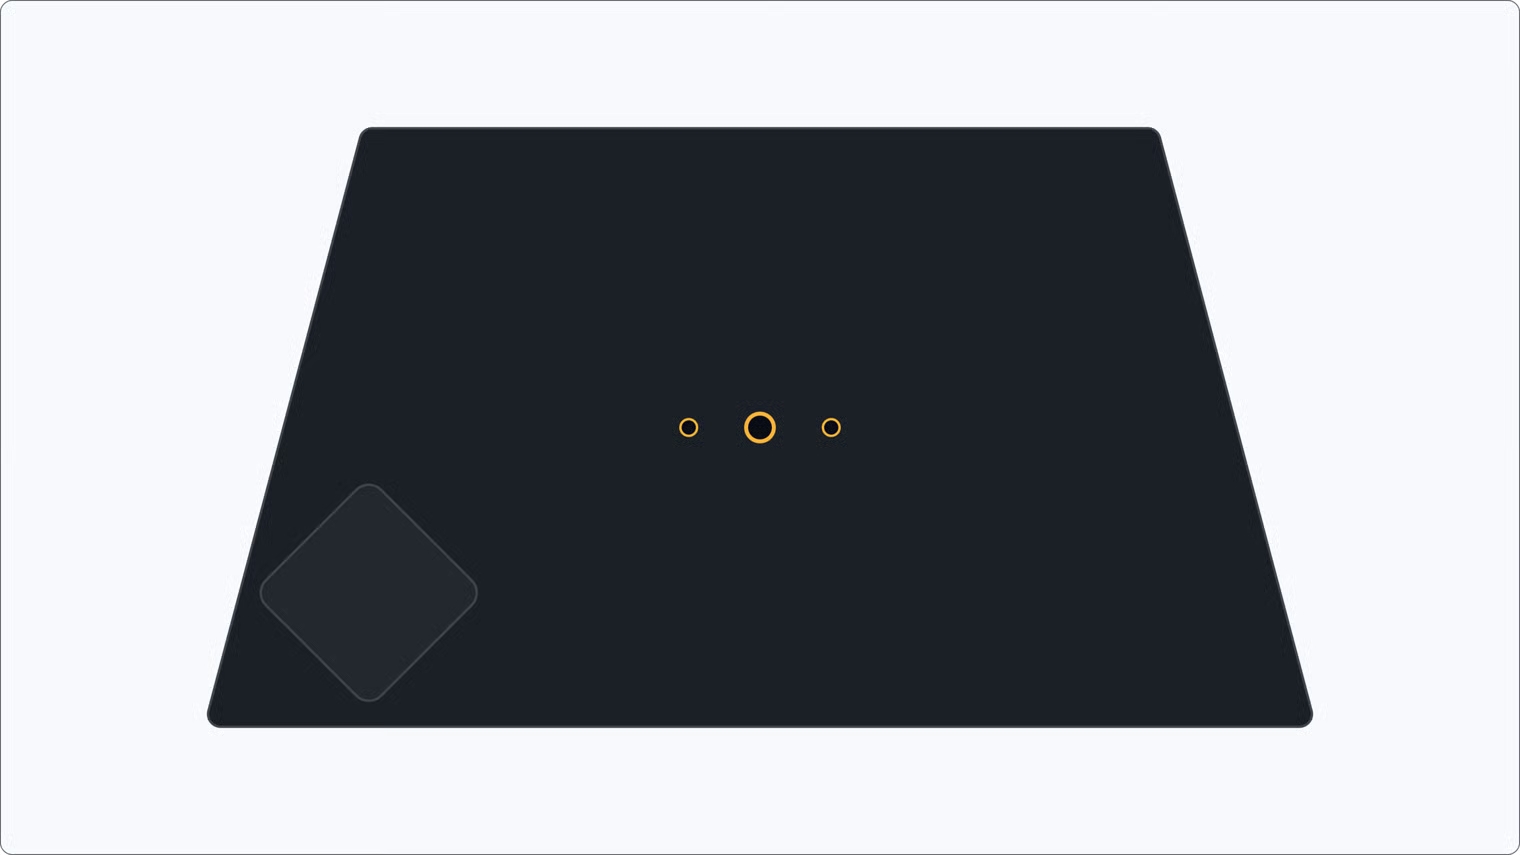
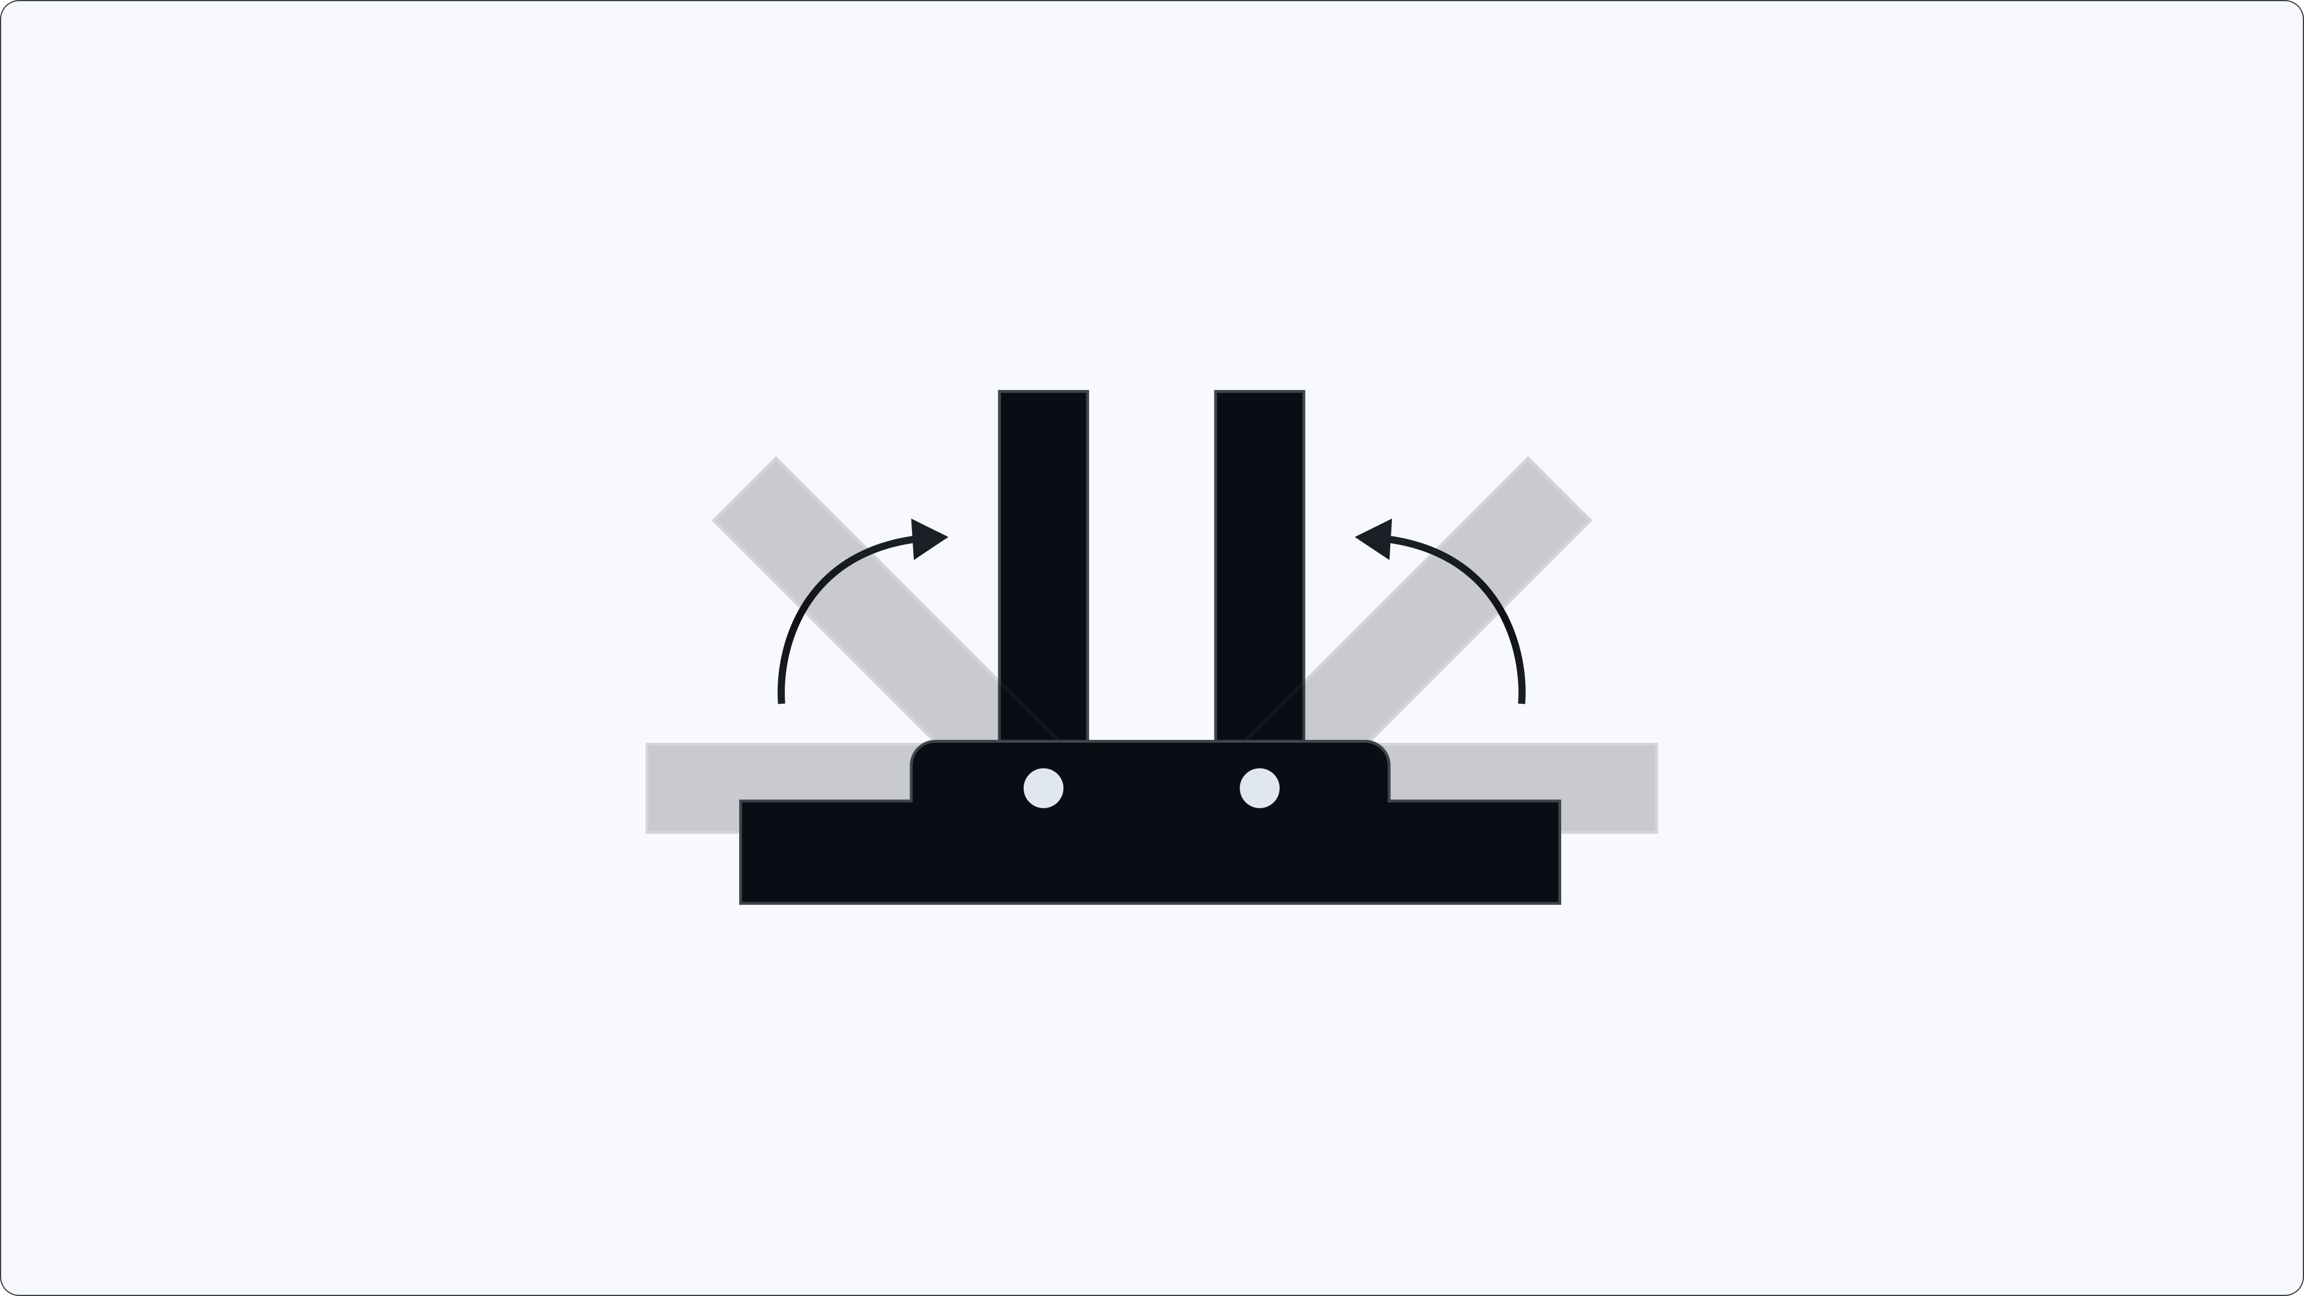
Locate the mounting threads on top of the Bee.
Lift both sides of the mounting bracket.
Place the bracket on the Bee, aligning holes with threads.
Secure with 2 small screws using the small Allen key.
Tighten with the large screw using the large Allen key.
Lower the magnetic sides of the bracket.
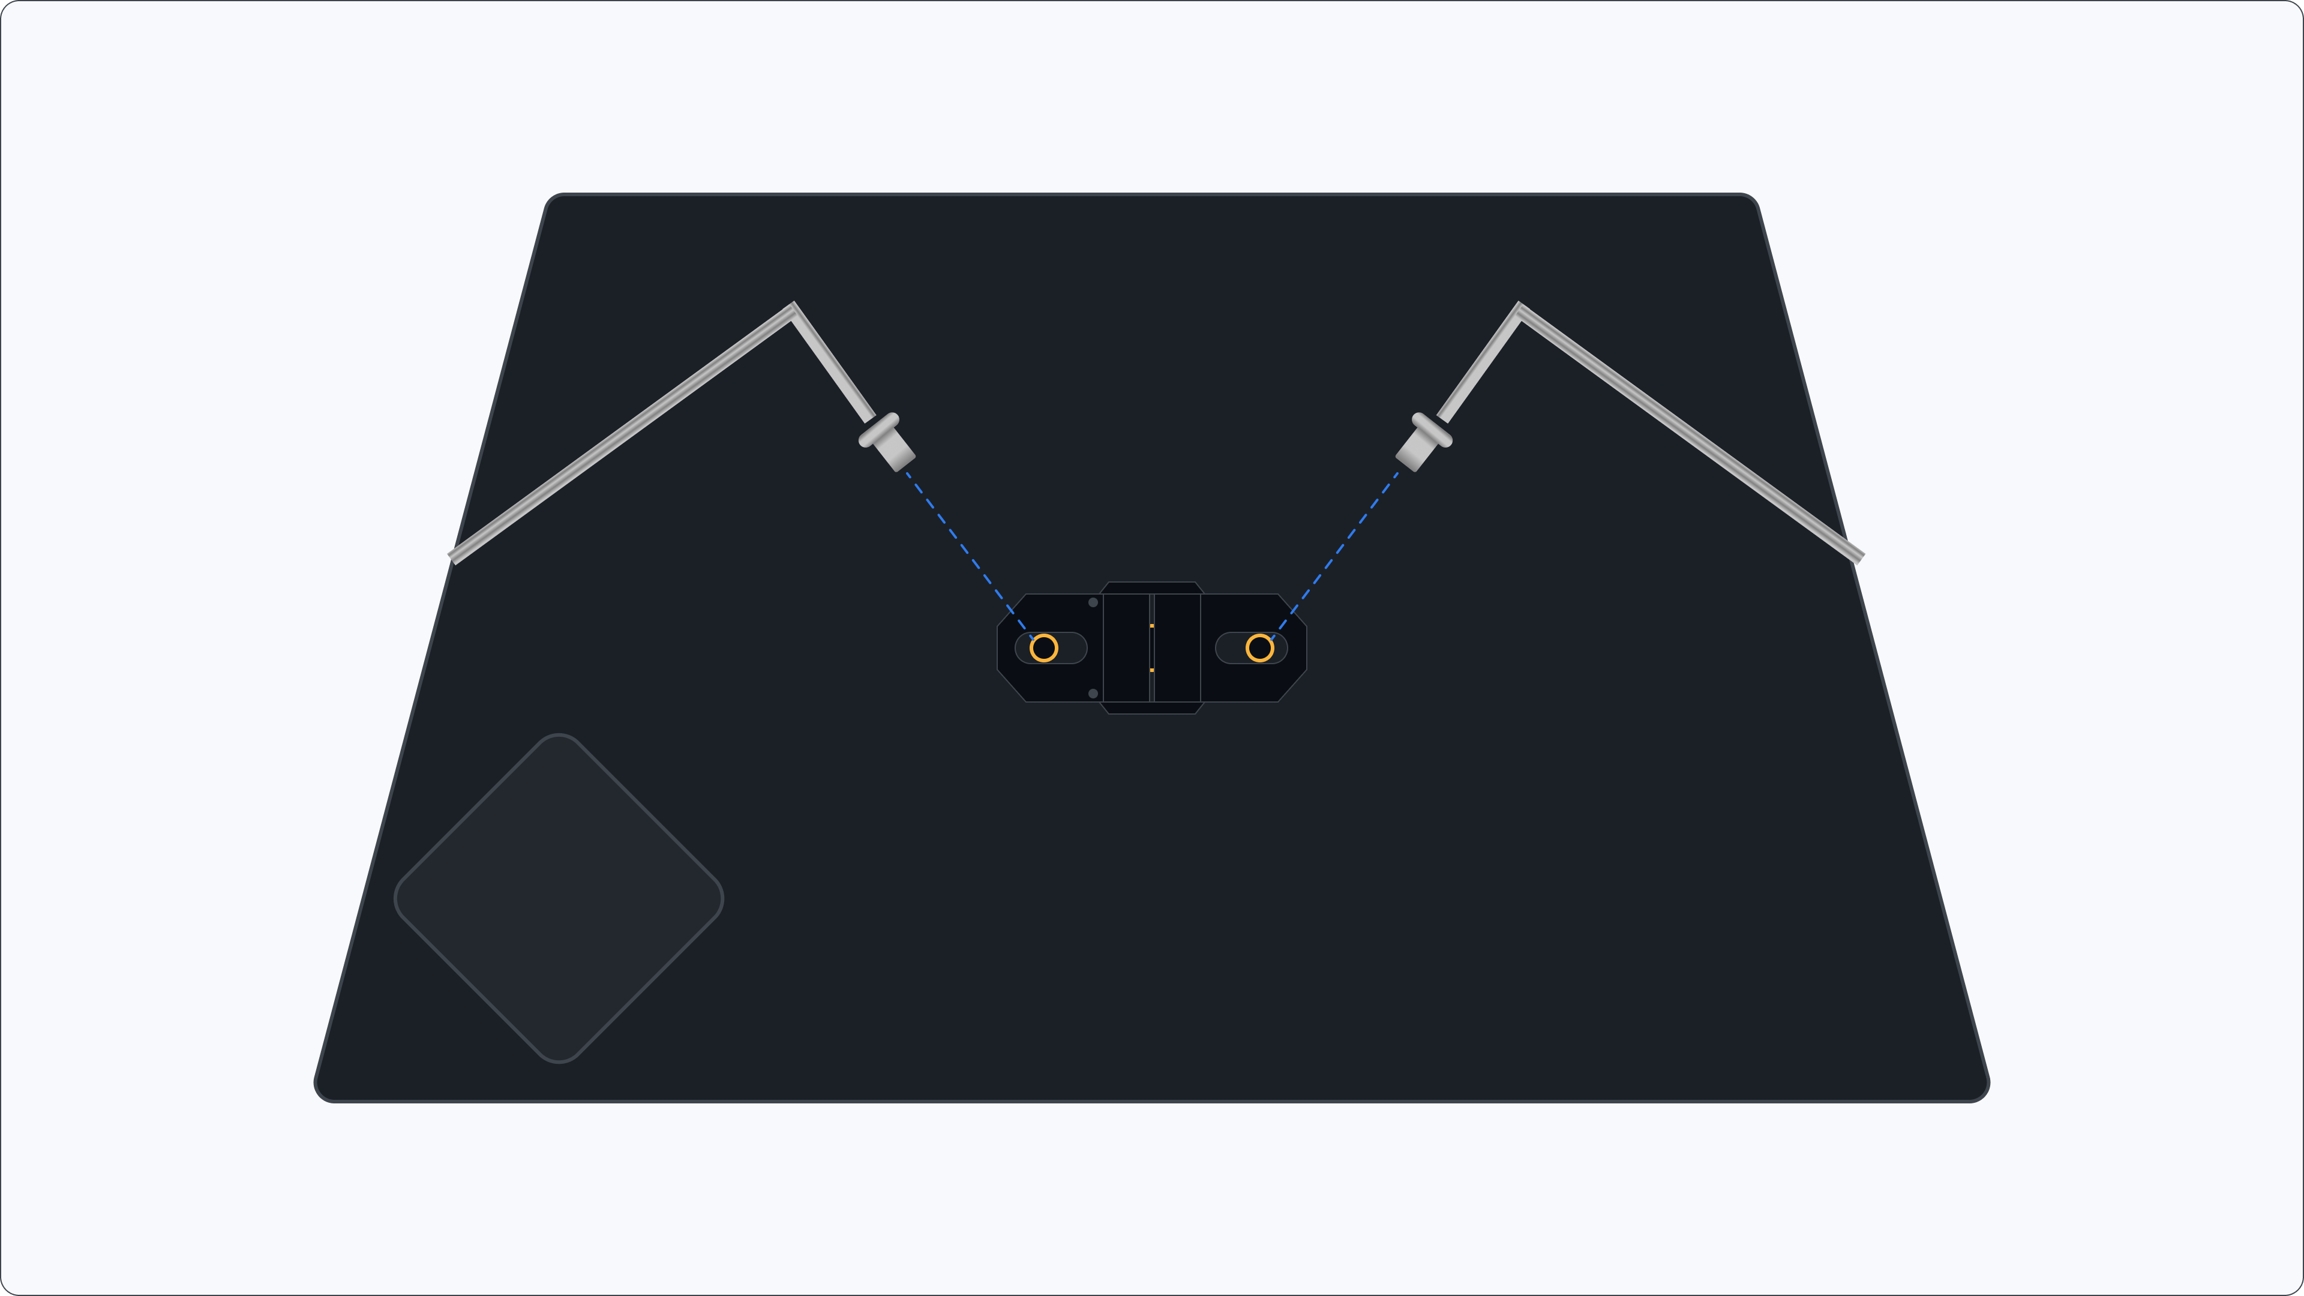
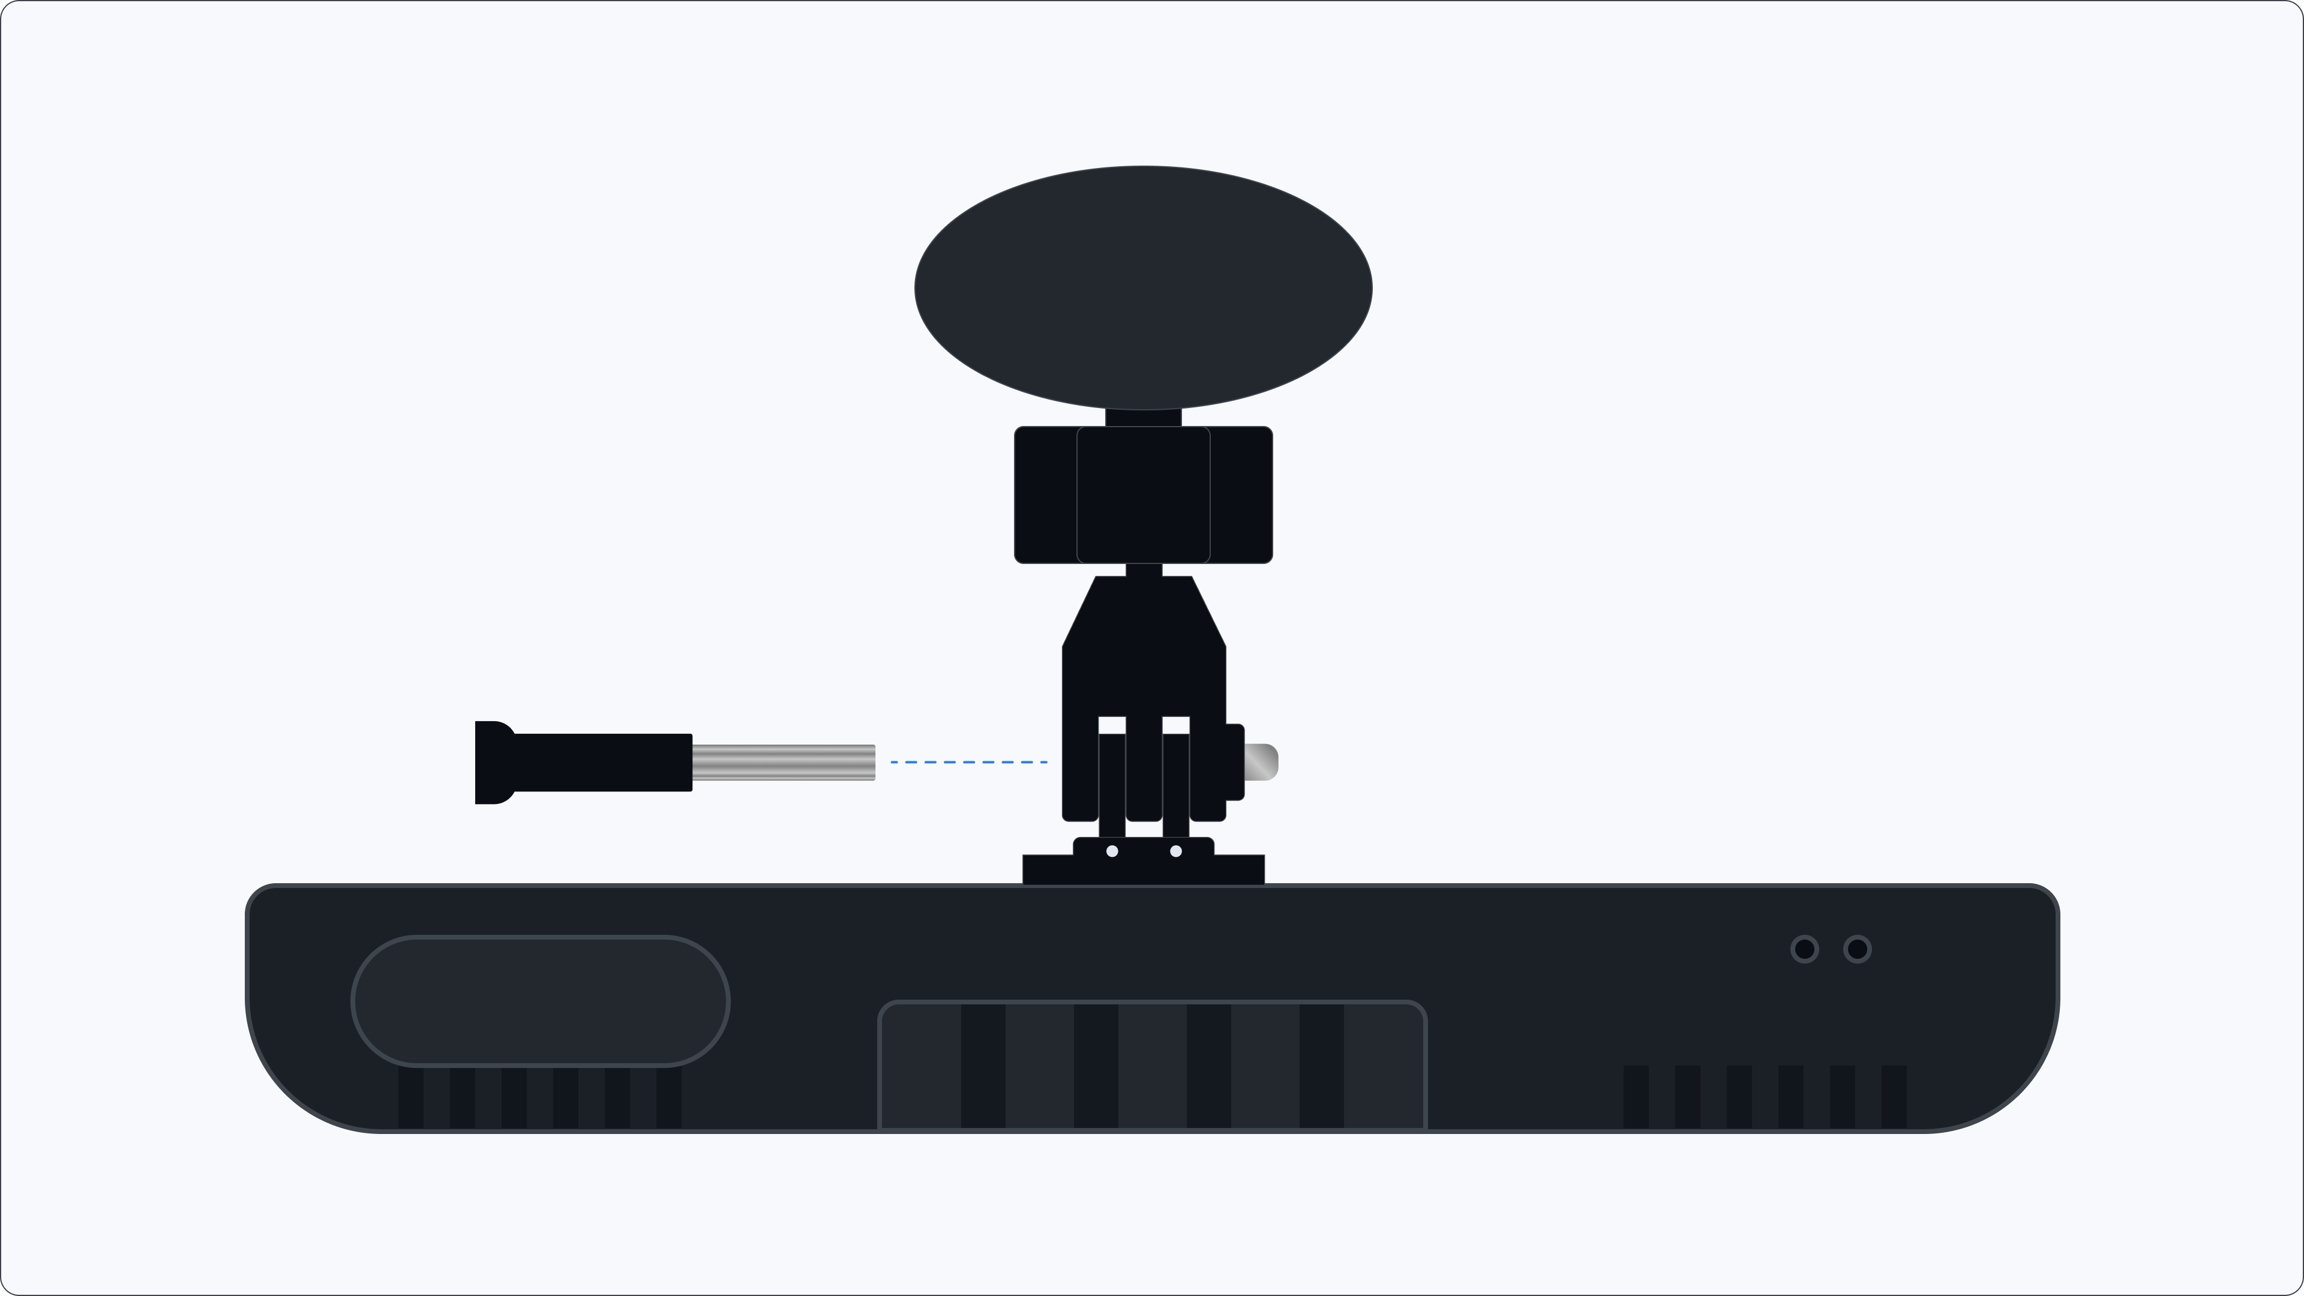
Remove the thumbscrew from the suction mount.
Slide the mount prongs into the bracket.
Align holes and secure with the thumbscrew.
Hold the opposite cap to prevent it from loosening.
🎉 Congratulations! Your Bee is assembled and mounted. Next, go to Insert SIM to power it up and connect.
Instructions for powering up your Bee and properly mounting on or inside your vehicle.
Find your car’s 12V outlet (often near the dash or console).
Plug in the included adaptor.
Connect the cable to the Bee’s Power port (underside of device).
The Bee is designed to be powered using a 12 volt accessory outlet. While the Bee may be powered using a USB-C charging port, not all vehicles supply enough power to these ports to successfully power the Bee.
Do not exceed 20V. Use only the included adapter. Some vehicles output >20V; check your car manual before installation.
High-quality begins with great mount positions. There are currently two approved mount positions (as shown below).
Your Bee is powered and mounted. You’re now ready to Connect and Activate in the next step.
Don't have an LTE Data plan? You can purchase one directly with Bee Maps here.
Bee LTE works with most major carriers worldwide. Tested carriers by region include:
United States
Helium, T-Mobile, Google Fi
Mexico
Telefonica, Movie Star, Bait
Canada
Rogers
UK
02, Smarty
Europe
Vodafone and most carriers
Australia
Optus, Telstra, and Vodafone
Important: You’ll need a physical Nano SIM card with data enabled. eSIMs are not supported.
Great work! With your SIM in place, your Bee is now ready to Mount.
Solid or slow red pulse (over 4 seconds)
✅ Power is good
No light
❌ No power
Fast blinking / mismatch
⚠️ Check power source / short condition
Vehicles with at least four wheels 🚗 🚛 🚕
Vehicles that don't have four wheels 🛵 🏍️


Fix common issues, keep your Bee up to date, and explore optional fleet setup.
-
Once your Bee is updated and any issues are resolved, you can continue mapping.
With your Bee connected, use these guides to start driving and upload your data.
Finished a drive? Your Bee will automatically upload data via LTE or WiFi.
Summarized analytics of fleet
AI tools that give you automated reports (AI Reports) and the ability to ask questions (AI Assistant) about your fleet and the thing they are seeing.
AI Reports → Automated dashboards that track driver performance, trip trends, and fleet efficiency without manual work.
Integrate fleet intelligence from the Bee directly into your own systems. Whether you want to pull trip data into your dashboards or trigger workflows when new events occur, our APIs and Webhooks make it simple to extend our Beekeeper fleet data into your operations.
– Request data on demand. Pull trip history, driver profiles, or device status into your internal tools and reporting dashboards.
Configure your Bee Maps account identity. Update your display name, email, and organization details to keep your account accurate and consistent across all Bee Maps tools.
Update your Display Name and Email Address.
Find locations, drivers, trips, and more instantly
The Search function lets you quickly locate maps, devices, and drivers within your Bee Maps platform. Use the filters below to find exactly what you’re looking for:
Map → Search by address or location.
Device ID → Enter a device’s unique ID to pull it up directly.
Device IMEI → Look up a device using its IMEI number.
Adjust your APN settings if it is necessary
If your SIM card is active but you don't have service, update APN Settings in the Bee Maps App:
Go to Settings → Bee → Upload Mode → Bee LTE → SIM APN Settings.
Enter the APN details provided by your mobile carrier and hit "Send APN info".
Select "Save and Reboot".
🛠️ If something isn’t working, head to Troubleshoot & Maintain.
Webhooks – Get data pushed in real time. Receive alerts when events like harsh braking, new trips, or device status changes happen.
Automate Workflows – Connect Beekeeper with dispatch, billing, or safety platforms.
Custom Insights – Build tailored reports beyond the Beekeeper AI Reports.
Seamless Integration – Use Beekeeper data where your team already works.


If you want to verify if your LTE is working:
Connect to your Bee device from your Bee Maps App.
In the Bee Maps App, go to Settings.
Go to Data.
Go to Upload Mode.
Select Advanced in the Bee LTE option.
The LTE Connection shows whether it’s connected or still searching — a check indicates it has LTE connection.
Make sure you are in an area with known LTE coverage.
You may need to adjust the APN settings - see here.
Open the Bee Maps app and tap Connect.
Select your Bee’s WiFi: "dashcam-XXXX".
Enter password: "hivemapper" (all lowercase).
Return to the Bee Maps app – your Bee will connect automatically.
Once connected, you’ll see a live preview at the top of the app as shown.
Do not connect through Android WiFi settings. If you already did, forget the Bee’s network before starting.
Power on the Bee.
Turn on WiFi on your Android.
Open the Bee Maps app and tap Connect.
Wait for your Bee’s name (e.g. "dashcam-XXXX") to appear in the list.
Select it and enter password: "hivemapper" (all lowercase).
If prompted, tap Allow to let the app discover WiFi networks.
Wait a few moments for the Bee Maps app to finish connecting.
Once connected, you’ll see a live preview at the top of the app.
Go to Bee.
Go to Mount Check (video demo).
Follow the instructions on-screen to adjust the camera’s Clarity and Tilt so the road view is sharp and properly aligned.
Place Bee on the windshield with a clear, unobstructed road view.
Block the driver’s view or mount on tinted/dotted glass.
Keep Bee level – not tilted up at the sky or down at the hood.
Leave personal items (name tags, papers) visible on the dash.
Open Bee Maps App → Settings → Profile.
Look for your mount rating (higher stars = better quality).
Go to Bee.
Status → Shows whether the App is connected to your Bee. Tap to connect if not already linked.
Model → Displays your Bee model - Bee LTE or Bee WiFi.
SSID → Shows the Wi-Fi network name of your Bee device.
Upload Mode → How your Bee sends captured data to the network.
LTE (only available with Bee LTE model)
Bee Maps App
WiFi Connect
Firmware Version → Displays your current firmware version.
A check mark means Bee is on the latest firmware.
AI Models → Indicates if you have AI models active on your device.
Advanced → Additional settings for power users (firmware options, fleet linking, etc.).
Must be connected to Bee to access.
Mount Rating → Your current mount rating (1–4 stars).
Trip visibility → Follow live routes and see exactly where vehicles are.
Driver view → Access snapshots from the Bee to verify conditions and improve safety.
Driver → Search for drivers by name.
License Plate → Search vehicles by the license plate recorded in the driver’s profile.
Vehicle → Filter by vehicle type: Car, Truck, SUV, Van, or Commercial.
Status → Search devices by their status:
Online → Device is on and active.
Idle → Device is on but not active.
Searching → Device is attempting to connect (e.g. searching for LTE connection).
Offline → Device is powered off or disconnected.
Asia
Chunghwa Telecom and most carriers


Mapping 101 with the Bee
Your Bee's AI starts mapping automatically when your vehicle is moving.
You can map in any weather.
You can map 24x7 — day or night.
Passively upload via or .
If the left LED is blue, your Bee device is mapping.
What do the Bee LED lights mean?
Left LED blue = mapping
Right LED blue = connected
If the right LED isn’t blue, your Upload Mode isn’t active.
Open Bee Maps app → connect to your Bee.
Look for:
Blue, pulsing icon = Bee is mapping.
Grey or static icon = Not mapping yet.
Instructions on how to upload with the Bee Maps app
Open Bee Maps App.
Go to Settings.
Go to Data.
Select Upload Mode.
Select Bee Maps App mode.
Select Preferences.
Select between:
Phone's Cellular Data: Uses your phone's cellular data to upload data.
Phone's WiFi Network: Happens automatically when app is connected to a trusted WiFi Network.
Open Bee Maps App.
Go to Settings.
Go to Data.
The app will first download data from Bee → phone (blue progress bar).
Open Bee Maps App.
Go to Settings.
Go to Profile.
The Profile section lets you manage your account information and wallet connection.
Username → Three word username automatically assigned to you.
Joined → The date your account was created.
Connection Type → The wallet linked to your account (e.g., Phantom or Breeze).
Mount Rating → Your current (1–4 stars).
Actions you can take:
Delete Account → Permanently remove your account.
Disconnect Wallet → Unlink your connected wallet.
Add Bee devices to your fleet on the Bee Maps platform
Important: If you are on Bee Membership you don't need to do this as your devices are already connected to your Beekeeper fleet. Instead, skip this step and Assign Drivers to your Bee devices.
Go to to create your account.
Connect
Open the .
Power on your Bee LTE.
Connect to its WiFi (dashcam-xxxxx, password: hivemapper
Enter the email linked to your account from (1) above.
If not prompted go to
Settings
Bee
Advanced Settings
Once your device is added to Beekeeper, you can assign drivers to it. .
Adjust automated trip trimming settings for your Bee
Trip Trimming automatically removes mapping data from the very start and end of each trip. This helps protect sensitive locations, like your home, office, or garage.
Mapping stops for that set distance when you begin driving.
Mapping also stops for the same distance before you end your trip.
Open Bee Maps App.
the Bee Maps App to your Bee device.
Go to Setting.
Go to Privacy.
If Trip Trimming is set to 500m, your Bee will skip recording the first and last 500 meters of every drive.
Webhooks allow real-time Bee devices data delivery to your systems.
Log in to your Bee Maps Dashboard
Go to Developers tabs
Click Create Webhook
Copy and save the token securely — it will only be shown once
All webhook payloads are signed with a Bearer token:
Webhooks are not retried
If a webhook delivery fails (non-200 response or timeout), it is skipped
The next eligible update will be sent normally
Coming soon – You’ll be able to restrict incoming requests to known IP ranges.
Trigger Fires whenever a Bee device's location changes.
Payload Format
Instructions on how to upload with LTE
Bee LTE upload mode requires a Bee LTE model with an active physical SIM card.
Open Bee Maps App.
Go to Settings.
Go to Data.
Select Upload Mode.
Confirm your is active.
If LTE doesn’t connect, don’t worry – you may just need to adjust your APN settings. Go for a step-by-step guide.
Open Bee Maps App.
Go to Settings.
Go to Data.
Check progress bar.
Assigning drivers ensures trips, events, and alerts are linked to the right people, not just the vehicles. This helps with safety monitoring, accountability, and compliance.
In the Bee Maps dashboard, go to your Drivers list.
Choose the device you want to update.
Click on the Device to view its details page.
Here, you’ll see live feed, drive history, data usage, and technical specs.
Under Edit Details, fill in:
Driver Name
Description (e.g., Employee ID, role)
License Plate
Record of completed trips with key metrics
Trip History provides a comprehensive record of all vehicle journeys, including:
Start and end times for each trip.
Stops made with duration.
Total distance and trip duration.
Location of each stop.
Total trips for the day or week, and total mileage.
Download trip history into a CSV file.
The Map Style section lets you customize the look of your Bee Maps interface while driving or reviewing trips.
Open Bee Maps App.
Go to Settings.
Go to Map Style.
Light → A bright, high-contrast map style optimized for daytime driving.
Dark → A low-light style designed for nighttime driving or reduced screen glare.
Coverage → Renders Hivemapper Network street level coverage — refreshed every 24 hours in most areas.
Switch between styles anytime to match your driving conditions or personal preference.
A simple all-in-one plan to get your fleet started
Bee Membership gives you everything you need to start mapping and managing your fleet:
Bee LTE AI Device → AI-powered device that captures high-quality road and driver data.
Beekeeper Access → Full access to the fleet intelligence platform, with AI insights, safety alerts, and trip monitoring.
LTE SIM Connection → Always-on connectivity for real-time uploads and fleet visibility.
Telematics (Optional Add-On) → Vehicle data such as engine hours, fuel consumption, odometer, etc.
No setup headaches. Every Bee device ships pre-configured and ready for your fleet:
SIM card already inserted.
Device added to your Beekeeper fleet account.
Activation confirmed before shipment.
When your devices arrive, just mount them in your vehicles and start driving.
Lower upfront costs → A low monthly cost.
All-in-one plan → One monthly subscription covers device, software, and connectivity.
Hassle-free deployment → Devices are fleet-ready out of the box.
See for details and pricing.
Access and review recorded trip footage
Video History allows you to retrieve high-resolution footage from any Bee device by driver, date, and time.
It provides on-demand access to past trips for safety reviews, incident investigations, and compliance checks.
Each Bee device stores up to 10 hours of video from its most recent operation.
The Settings section is where you configure and customize how your Bee Maps account, fleets, and devices operate. These tools let you manage preferences, security, and integrations across your organization.
You can access Settings from the side navigation menu in your Bee Maps dashboard.
From here, you’ll find tools for managing:
Fleet Settings → measurement units, USB recording, and device security
Devices → search and view all devices in your fleet
Connection → link your wallet for rewards and payouts
Stay on top of your subscriptions and payments. Add or update billing methods, and view invoices and history for Bee Membership, map data, or other Bee Maps services.
Payment → Add a credit card to support payment for:
Subscriptions.
Map data API consumption.
Fleet software services.
Invoice History →View past invoices and payment history.
The Orders section lets you view order history, purchase details, and shipping updates.
Order Number → A unique identifier for each purchase.
Purchase Date → The date and time when the order was placed.
Tracking Number → Shows the shipment tracking details once your order has been fulfilled.
To start using the Bee Maps Platform, you’ll first need to create an account. One account gives you access to everything:
Manage your fleets with Beekeeper.
Use Bee Membership and subscriptions.
Connect APIs and Webhooks.
Learn about the three different ways to upload data with your Bee
Bring real-time vehicle data like fuel level, odometer, and more into your fleet dashboard.
Telematics provides live insights into your vehicles by connecting directly to their onboard systems. It tracks information such as engine status, battery, and fuel level – all viewable within your Bee Maps dashboard.
With fleet telematics, it unlocks real-time data that improves operational efficiency, reduces costs, and increases safety and supports ELD legal compliance.
This feature is powered by DIMO, a device that plugs into the vehicle’s OBD-II port and automatically sends vehicle data to your fleet dashboard.
Whether you are a consumer or business operating a fleet, we take your privacy seriously and provide multiple ways to ensure that your devices are not mapping where you don't want them mapping.
The Privacy section gives you control over how location and trip data is handled.
Open Bee Maps App
Control who has access to your Bee Maps account. Add team members, assign roles with the right permissions, and monitor activity to keep your organization secure and collaborative.
Add Users → Invite new members via email.
Assign Roles → Choose from four role types:
Owner → Full access to all features, users, devices, and billing. Best for administrators who oversee the entire account.
Advanced Metrics → Metrics about your Bee's map data generation.

Attach your Bee to your Fleet
Beekeeper → Enable
Confirm
Your Bee appears in the Beekeeper dashboard with status, trips, and uploads.


Go to Trip Trimming.
Use the slider to choose a trimming distance (e.g., 500m).

Vehicle Type (e.g., SUV, Truck, Van)
New information added to each field will be automatically saved.


You can now deploy custom edge detections on the Bee device—models that run alongside (but do not replace) the native Bee Map AI stack. This lets you extend the Bee’s detection capabilities for your own needs, such as identifying specific utility markers, custom signage, or industry-specific infrastructure.
The core object detection model used for map building is maintained and updated by Bee Maps. However, your edge detections can operate in parallel on the device—filtering, tagging, or flagging new visual classes relevant to your operations.
Deploy models via OTA (over-the-air) using Bee Maps’ geo-targeted infrastructure. You can push to specific devices by region—country, state, or metro—allowing you to target detections based on where and what you need to capture.
The Bee runs a high-efficiency, edge-optimized YOLO model in real time on every frame from its 12.3MP camera. With 5.1 TOPS of compute on board, it delivers low-latency inference even in fully offline or low-bandwidth environments.
How to Deploy a Custom Model
• We collaborate with partners to train objects.
• Your model is deployed to a small subset of Bee devices to validate accuracy and recall.
• Once approved, it’s rolled out to your designated geographies via an OTA update to Bee devices.
The Bee’s Map AI continuously detects and maps critical road features, including speed limit signs, stop signs, road width, and other street-level attributes. Additionally, when deploying custom object detections—such as utility infrastructure—you can leverage Change Detection to efficiently identify and upload only the changes (deltas), significantly optimizing data transmission.
Bee - Native Mapping Detections (eg speed signs, traffic lights, etc.)
Your own dataset for these objects
Your Custom Object Detections
Your own dataset for these objects
You can track changes to specific infrastructure objects—like speed limit signs—by uploading a reference dataset in GeoJSON format. Each object should conform to our feature spec, for example:
Bee Maps automatically partitions and distributes these objects to devices most likely to encounter them. As Bees detect and upload fresh observations, your GeoJSON file is updated. You can subscribe to real-time changes via API to track updates as they occur.
All data generated from your custom edge detections and change detection workflows—along with optional supporting imagery—is automatically streamed via Bee Connectivity Services from the Bee to your Bee Maps developer account. Bee Connectivity Services leverages the device’s built-in LTE and WiFi offload channels, requiring no additional integration work on your part.
Simply configure your endpoint, and the Bee will immediately begin transmitting structured visual data in real time, ready for ingestion into your systems or workflows.
Contact us [email protected] to become a Bee developer.

Authorization: Bearer <your webhook token>{
"device": { "id": "681da6f00000000000000000", "name": "Device A" },
"lat": 37.7371066,
"lon": -122.4027606,
"speedKmH": 89.37,
"timestamp": "2025-05-09T15:58:59.465Z"
}{
"id": "SLS1553923",
"objectClass": "speed-limit",
"image-detection": "https://your-bucket-name.s3.beemaps.com/path/to/image.jpg",
"attributes": {
"speedLimit": 50,
"unit": "mph",
"regulatory": "enforced"
},
"position": {
"lon": -108.123,
"lat": 34.234,
"azimuth": 90,
"height": 0.5,
"width": 0.3
},
}


Then it will upload data from phone → Hivemapper (turquoise progress bar).

Select Bee LTE.
Under the Bee LTE selection click Advanced.

Explore future Bee Maps tools.
Go to https://beemaps.com/login.
On the login screen, enter your email address or login via Google.
After signing up, you'll receive a confirmation email.
Open the email and click the link to complete login.
Once confirmed, you’ll be taken to the Bee Maps Platform landing screen.
From here, you can:
Add your Bee devices.
Manage your fleet in Beekeeper.
Enable APIs or Webhooks.
Configure account settings.
Go to Settings
Tap Connect Wallet
If you do not have a Wallet, create one using Breeze or Phantom.
Go to Settings → Data → Upload Mode. Here, you’ll see three options to choose from:
Yes
Uploads directly from the Bee LTE device via SIM connection.
Yes
Uploads when Bee connects directly to a trusted WiFi network.
No
Uploads via your phone when connected to Bee.
To see how much data your Bee has uploaded:
Open the Bee Maps App.
Go to Settings → Data.
Review recent and past uploads (e.g., last hour, today, this period) by type (e.g., WiFi, App, LTE).
Speeding
Over 85 MPH
Swerving
Aggressive swerving maneuvers
Harsh Braking
Sudden stops
Aggressive Acceleration
Trying their best to be an F1 driver
G Force
Helpful for accident detections
Running Stop Sign
Rolling through a Stop sign
Each event is flagged and supported by a 10–30 second video clip for context.
Alerts allow managers to coach drivers before small risks become costly incidents.
Open Bee Maps App.
Connect the Bee Maps App to your Bee device.
Go to Setting.
Go to Privacy.
Go to Privacy Zones.
Tap the Privacy icon on the bottom left corner of the screen.
Move the map to select a location.
Adjust the radius using the slider.
Tap Use This Location (first time) or Use This Radius (for updates).
Block uploads around your house or workplace.
Protect recurring locations where you don’t want data recorded.
You can create multiple Privacy Zones.
Zones appear as red circles on the map and can be resized anytime.
Privacy Zones is device/user specific.
If you are on a Privacy Zone, the light on your Bee device will turn red.
Model
Plan
Driver
Last Seen
Firmware
Device Lock Status
USB Recording Status
Only DIMO devices purchased through Bee Maps (either via Bee Membership or as an add-on) along with their Bee device can use this feature.
Plug in the device
Install the DIMO device into your vehicle’s OBD-II port.
It will power on automatically and come online within 1–2 minutes.
Need help installing the DIMO device into your vehicle? Here's a helpful guide.
View in dashboard
to your dashboard
The DIMO device will appear under Settings → Devices → Telematics
Pair with Bee
If not yet linked to a Bee device, the pairing column will show “Pair Device.”
Click “Pair Device” and select the matching Bee driver.
Once paired, telematics data will automatically appear on the Driver → Details page, updating in near real-time.
You’ll see key vehicle information such as:
Vehicle Make, Model, and Year
VIN#
Location
Engine ignition - On or Off
Engine error codes
Engine Hours
Battery level
Fuel level
Odometer readings
Plugged In or Unplugged
If the DIMO device is unplugged, fleet managers will see this through their dashboard, alerting them of potential bad behavior from their drivers.
One DIMO → one Bee LTE device only.
Supported Vehicles: You can find the list of supported vehicles here.
Find more FAQs about Telematics here.
Field services (utilities, telecom, medical, waste management).
Construction and heavy equipment.
Local government and public services.
It works whether you manage 5 vehicles or 5,000.
Bee AI Cameras
Each Bee device collects road and driver data in real time, providing continuous visibility.
Fleet Platform
Software processes this data into live insights, safety alerts, and dashboards for immediate action.
Important: If you are on Bee Membership your devices are already connected to your Beekeeper fleet. Jump ahead and Assign Drivers to your Bee devices.
Go to App.
Version → Displays the current app version installed on your device.
Build → Shows the internal build number, useful for troubleshooting or support.
Debug → Dynamically enabled to access debugging options (typically used for advanced troubleshooting).
Reduce Battery Optimizations (Android only) → Helps ensure the Bee Maps app runs reliably in the background by reducing battery optimization limits.
Go to Settings
Go to Privacy
Privacy Zones → Define zones (e.g., your home or office) where mapping automatically pauses to protect sensitive locations.
Trip Trimming → Automatically trim the start and end of trips (default: 500m) to avoid recording exact departure or arrival points.
Legal Placards → Access required compliance information for operating your Bee device.
Privacy Policy → Review Bee Maps’ full privacy policy for details on data collection and usage.
Unit of Measure → Choose between miles or kilometers for distance-based metrics.
Organization ID → A unique ID assigned to your team, used to identify your organization across the platform.
Member → Read-only access to monitor fleet activity. No editing, API, webhook, or billing permissions – suited for general staff.
Manager → Can manage users, fleet settings, and API keys, but not billing or device connections. Ideal for team leads handling daily operations.
Developer → Can create and manage API keys and webhooks, and review usage data. No access to billing, users, or device settings.
Monitor Activity → Track when each user last logged in.
Remove Users.
Tech specs such as firmware version.
LTE usage metrics.
LTE carrier information e.g. IMEI.
Go to Settings.
Go to Data.
Select Upload Mode.
Select WiFi Connect mode.
Under the WiFi Connect selection click Configure.
Tap Scan for WiFi Networks.
The WiFi network must be in range of the Bee.
Select the trusted WiFi network you want your Bee to use.
Enter the WiFi's network password.
Tap Join.
Blue checkmark indicates that your Bee is connected to the saved WiFi Network.
Open Bee Maps App.
Go to Settings.
Go to Data.
Check progress bar.


The Data section shows the status of your Bee device and manages how mapping data is uploaded to the network. What you see here depends on the Upload Mode you’ve selected (Bee LTE, WiFi Connect, or Bee Maps App).
Open Bee Maps App.
Go to Settings.
Go to Data.
Status → Shows whether your Bee is currently connected. Tap to connect if not already linked.
→ Choose how your Bee sends captured data to the network (via LTE, Bee Maps App, or WiFi Connect).
Transfer & Upload Status → Displays progress bars as your Bee or App are transferring and uploading data.
History → Tracks upload volume across timeframes.
Last Upload → the last time you successfully uploaded mapping data.
3rd party mounts and OBD-2 adapters for the Bee
Best for cars and light trucks on smooth roads. Simple, reliable, and ideal for daily use.
— ⭐️ Community Favorite
+
Best for heavy trucks, construction vehicles, or fleets driving on rough roads and at higher speeds.
— ⭐️ Community Favorite
(extra support for interior mounts)
Expand Bee’s power options with a direct, stable connection through your vehicle’s OBD-2 port.
Welcome to the Bee Maps Platform – your single login for everything Bee Maps.
With one account, you can:
Access Mapping and Location Data APIs.
Manage Beekeeper for Fleets.
Think of it like your Bee Maps workspace: one account, many tools, all working together.
Sign up for Bee Maps: and secure access to all Bee Maps tools.
Confirm your email: Activate your account by verifying your email address.
Access your dashboard: Once confirmed, you’ll land on the Bee Maps dashboard to start adding devices, fleets, or developer integrations.
Detailed steps: see .
Profile settings: Update your display name, email, and organization details.
Add your team: Invite teammates to your Bee Maps account with roles and permissions.
Billing & subscriptions: Manage Bee Membership plans, payment methods, and view invoices.
Configure your fleet: Link Bee devices, assign drivers, and set preferences.
Detailed steps: see .
Yes, and it requires an active cellular data plan.
Can I use my own SIM card in the Bee LTE?
Yes, as long as it’s compatible with the supported networks in your region.
SIM card size for the Bee is nano.
What happens if the Bee devices lose LTE signal?
It will appear in the Monitoring list as "Searching" — once it regains LTE it will upload everything it stored on the device when it had no LTE connection.
Can I see how much LTE data my fleet is using?
Yes, under the Assistant tab it shows LTE data usage by device and overall.
You can also view LTE usage per device in the Driver Profile.
How do I know if the firmware of my Bee devices is up to date?
A checkmark under the driver profile means the Bee is running the latest firmware.
Firmware updates are automatic OTA (over-the-air) and require no manual work.
Can I disable the USB data port on the Bee for my fleet?
Yes, this stops all Bees from recording to USB drives, even if plugged in.
Go to
Beekeeper Settings.
Go Fleet Settings.
USB Recordings.
Can I connect the Bee to the OBD-2 port?
Yes, this adapter works.
Does the Bee require professional installation?
No, it takes under 5 minutes to install. Just plug it in, mount it, and you’re good to go.
Is there a microphone or speaker on the Bee?
No.
Does the Bee have an internal facing camera to spy on drivers?
No, most data doesn’t require an internal camera, and it’s a bit creepy.
Can I see the mount rating for my devices?
Yes, under the Assistance tab there is a report that provides mount ratings for each Bee device.
Does Beekeeper lock Bee devices to my fleet?
Go to Fleet Settings > Opt Out via App > Disabled.
If disabled, users can’t leave your fleet through the Bee Maps App.
Can I assign drivers or vehicles to specific Bees?
Yes, Beekeeper lets you tag and label devices for better organization. See the driver profile.
Can I remove a Bee device from my fleet?
Yes, by connecting the Bee App to the Bee you can remove it from your fleet.
Is Beekeeper supported in all countries?
No, its no supported in Iran, North Korea, Russia, China, and a few other smaller countries where we are restricted from selling the Bee LTE devices.
Can I add other users to help manage the fleet?
Yes, go to Settings > Users and invite your team members to manage your fleet. See here for additional details.
Where can I view all devices in my fleet?
Yes, go to Settings > Devices. See here for additional details.
What happens if my vehicle was in an accident?
If a Beekeeper AI Event detection was not triggered we store the last 10 minutes of video on the device, so be sure to turn the device off and contact customer support.
Can I access trip history and events in real-time?
Yes, Beekeeper shows live trip activity and logs events as they happen.
Trip history is also stored and searchable.
How long are video clips from AI Incidents retained for?
12 months.
How frequently can AI Reports be refreshed?
Every 60 minutes.
How much power does the DIMO device use?
15mA is being used when the vehicle is turned off
What type of security does the device provide?
The DIMO device is built in Secure Element supporting Koblitz curve.
Does the DIMO device need firmware updates?
Firmware updates are done Over the Air (OTA).
Will the telematics device tell me if its been unplugged?
Yes.
Does the telematics device support ELD reporting?
Yes.
Are Bee devices in a Beekeeper fleet contributing to Hivemapper?
Yes, all Bee devices contribute to Hivemapper while at the same time performing all of the core functions for your fleet.
See here for details on APN Settings.
Will the Bee continue to operate when it loses connectivity?
Yes, if your Bee LTE loses connectivity it will continue to perform and once it regains connectivity it will send updates.
What is the max voltage that Bee accepts?
The Bee accepts a maximum direct voltage of 20V.
Provide more than 20V, you may cause damage to your Bee. See here for power details.
Can I plug my Bee into any USB port in my vehicle?
Yes, but not all USB ports are supported.
It must be a USB-PD to provide sufficient power.
How much video is stored on the Bee device?
Up to 10 hours of video are stored on the device and can be retrieved remotely via Beekeeper.
You can also insert your own USB stick into the Bee and record as much as you like.
Will the Bee device map while also performing safety and monitoring functions for Beekeeper?
Yes, it's a dual purpose device.
How do I add an existing Bee device to a Beekeeper fleet?
See here.
Do Bee Membership devices need to be manually added to a fleet?
No. When Bee LTE devices in a Membership plan ship they are connected to a fleet for you in advance of shipping.
Can I add a Bee WiFi model to a Beekeeper fleet?
Not yet, only a Bee LTE model can be added to a fleet.
Can I lock a Bee device to my Beekeeper fleet?
Yes, the Bee LTE device will only work for your fleet connected and locked to your fleet.
Can I remotely retrieve video from the Bee?
Yes, using the Beekeeper fleet software you can request that a Bee device upload video - see here.
Are my contributions anonymous?
Yes, the Hivemapper Network takes privacy seriously.
The Bee Maps App has additional privacy controls you can set.
Who owns the mapping data produced by the Bee?
The Hivemapper Network.
Where and when can I map?
Any weather.
Any road.
24x7.
Where can I mount my Bee?
See here for approved mount positions.
Can I side mount the Bee?
No. It must be forward facing with a good view of the road and no obstructions.
How can I tell if my Bee is mapping properly?
See here.
What happens to my data if I switch from App Upload Mode to Bee LTE Upload Mode?
When switching from App Upload Mode to Bee LTE Upload Mode, the app will continue uploading any remaining data in the background. At the same time, all data still stored on the Bee device will upload through the newly selected Bee LTE Upload Mode.
When am I rewarded with HONEY for mapping with the Bee for Hivemapper?
Every Wednesday evening. See here for details on HONEY.
Where can I see map coverage?
On the Bee Maps App - see here.
How much data does it consume for mapping?
Depends where you are mapping.
If you are uploading via LTE or WiFi Connect, it's approximately 0.5 to 10 MB per Km.
Split into App and Bee columns so you can see where uploads came from.
App column → uploads made through the Bee Maps App.
Bee column → uploads made via the Bee using LTE or WiFi Connect.
Last Hour / Today → Quick activity view.
This Period / Last Period → Larger historical breakdowns.


Connect developer tools: Enable APIs and webhooks to connect Bee Maps data to your systems.

On Fleet Data API Key click Generate API Key
Copy and save the key securely — it will only be shown once
All API requests require the API Key in the header:
Endpoint
GET https://api.trybeekeeper.ai/v1/devices
Returns a list of all devices in your fleet.
Response Format
Endpoint
GET https://api.trybeekeeper.ai/v1/location
Query Params
deviceId (required)
Returns the latest known location of the specified device.
Response Format
Endpoint
GET https://api.trybeekeeper.ai/v1/trips
Query Params
deviceId (required)
startDate (required, ISO format)
endDate (required, ISO format)
Returns trips taken by a device within a specified date range.
Response Format (truncated for clarity)
Lists rewards information for all devices in fleet, for a given reward period. A reward period is a calendar week.
Endpoint
GET https://api.trybeekeeper.ai/v1/hivemapperRewards
Query Params
rewardPeriod required. date must be a Monday e.g. 2025-05-12
Returns rewards for your devices in your fleet
Response Format
Authorization: Bearer <your API key>{
"devices": [
{
"id": "string",
"serialNumber": "string",
"name": "string",
"description": "string",
"deviceModel": "string",
"firmwareVersion": "string",
"vehiclePlate": "string",
"imei": "string"
}
]
}{
"device": { "id": "681da6f00000000000000000", "name": "Device A" },
"lat": 37.7371066,
"lon": -122.4027606,
"speedKmH": 89.37,
"timestamp": "2025-05-09T15:58:59.465Z"
}{
"device": { "id": "681da6f00000000000000000", "name": "Device A" },
"startDate": "2025-03-29T00:00:00.000Z",
"endDate": "2025-04-01T00:00:00.000Z",
"totalDistanceKm": 169.49,
"trips": [
{
"id": "681da7f00000000000000000",
"firstStop": {
"lat": 37.44178556,
"lon": -122.15897415,
"stopBeganAt": "2025-03-30T21:56:28.573Z",
"stopEndedAt": "2025-03-30T22:23:22.322Z"
},
"secondStop": {
"lat": 37.43422606,
"lon": -122.20949056,
"stopBeganAt": "2025-03-30T22:35:56.935Z",
"stopEndedAt": "2025-03-31T14:43:54.499Z"
},
"distanceKm": 6.41,
"durationMs": 754613,
"polyline": "uvocFfmrhVSd@..."
}
]
}{
"periodStart": "2025-04-28",
"periodEnd": "2025-05-05",
"devicesWithRewards": [
{
"deviceId": "6789bd99bfa474f4ca7d0001",
"deviceName": "Device A",
"rewardAmountHoney": 285.84,
"rewardedTotalKms": 602.56,
"rewardMountRating": 2
},
{
"deviceId": "6789c4a14f09505cee530002",
"deviceName": "Device B",
"rewardAmountHoney": 453.87,
"rewardedTotalKms": 1101.51,
"rewardMountRating": 4
},
{
"deviceId": "678acefa8e37f96443f60003",
"deviceName": "Device C",
"rewardAmountHoney": 253.15,
"rewardedTotalKms": 803.73,
"rewardMountRating": 3
},
]
}
The Bee may reboot after updating.


Bee Maps is built with data from the Hivemapper Network, whose mission is to build a useful map for people everywhere to use while protecting their privacy. The personal information and location data of Hivemapper Network contributors and Bee Maps customers is not the product. For this reason, the network has been designed to be private and anonymous, and to uphold the highest standards of data protection and privacy for both contributors and bystanders.
You can find more information on the privacy center, a comprehensive portal that includes all the relevant information about privacy at Hivemapper, including:
Key aspects of data collection and data products generated from map imagery
A list of cities and countries where mapping collection is occurring each quarter
The current
Here are some of the ways that we implement "privacy by design."
Bee Maps will never ask contributors to share personal information such as phone numbers, credit card numbers, or home addresses, except when absolutely necessary to fulfill a shipment. The Hivemapper Network generates random three-word usernames to protect the identity of its contributors, and asks contributors not to share their usernames anywhere to shield their identities.
The location data in the is not associated with a username. Hivemapper doesn’t share usernames or places that have been mapped, so no one will know those locations unless provided. The Hivemapper Network uses various means to verify mapping data location while allowing contributions to remain anonymous.
The first 500 meters and the last 500 meters of a given trip are automatically discarded. A contributor can adjust this up to 1,000 meters. This feature cannot be disabled.
This feature enables a contributor to define specific geographic areas — be it around their home, workplace, or any other location — as zones where their device will stop recording. Whenever the contributor’s device enters a personal privacy zones, it automatically pauses data collection. This eliminates a contributor’s need to manually stop or disable the device as they navigate spaces that they don’t want to map.
Personal Privacy Zones are never shared with Hivemapper servers, and remain confidential only to the contributor.
Network Privacy Zones extends privacy to sensitive areas where everyone’s data collection will be paused. If a location such as a military base, nuclear power plant, or private industrial facility is designated as a Network Privacy Zone, the Hivemapper Network automatically blocks collection within that area.
All Hivemapper devices make it clearly visible to the contributor when they are actively mapping via LED lights and via the companion app. Bee Maps built on the Hivemapper Network is transparent about the data that contributors are collecting and how it is leveraged to build the network and Bee Maps. Furthermore, the Hivemapper Dashcam is an open-source device, and anyone can inspect the that determines what is collected.
The Hivemapper Network uses computer-vision algorithms to blur out faces, bodies, vehicles, license plates and faces to protect the privacy of anyone who happens to be captured in mapping images. For example, the image below shows a submission from a Hivemapper contributor that went through privacy blurring. Blurring occurs automatically on the edge on all device models.
Bee Maps and the Hivemapper Network can assist with blurring or deletion of personal information that is inadvertently collected by the network. If you have a request, please fill out the request form in our or contact us at [email protected]. To help Hivemapper identify the relevant materials, please include the following pieces of information in your message:
The three-word username of the contributor and the time window when the collection occurred.
The street address where the collection occurred and a description of the precise area, including landmarks such as position relative to adjacent streets.
The type of private information that was collected.
In certain countries, we work to ensure that bystanders are aware that a device is collecting for a map, device contributors mount a placard provided by Hivemapper.
Blockchain technology facilitates a new level of encryption, privacy, and anonymity. The Hivemapper Network is built on the blockchain.
Hivemapper Network contributors and Bee Maps customers who receive HONEY require a to the Hivemapper and Bee Keeper app. Generally, wallets don’t track personally identifiable information and are not necessarily linked to your identity.
The Hivemapper Network proactively works with government regulators to ensure that our privacy standards meet local regulations and are the best in the industry.
Fresh, geolocated street-level imagery from around the globe
Bee Maps designed the Map Image API to allow developers and enterprises to easily access imagery from the Hivemapper Network.
Log in to
Go to Developers tabs
On Map Data API Keys click Generate API Key
Copy and save the Map API Key securely — it will only be shown once
Routes requiring Basic authorization
Encode the orgID and Map API Key in base64
The encoding format is OrgID:MapAPIKey
is a Python wrapper for the Map Image API, see GitHub .
Example query Python query using
Cost
$1 per road km per week. For example, requesting imagery for the same 1 km of road over 3 weeks costs $3.
Billing Cycle
Charges are billed every two weeks to the credit card on file. If usage reaches $500 before the cycle ends, the card is charged immediately.
Before using the API, you can quickly evaluate a large set of .
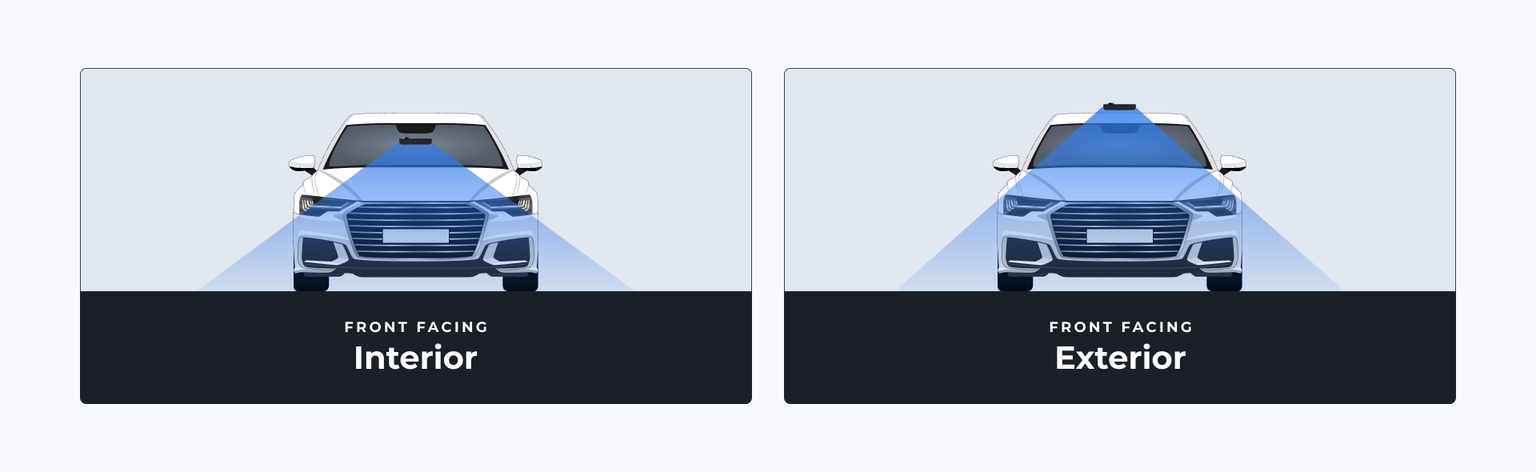
Forward facing (interior or exterior mounted)
1080p
Lane-level positional accuracy
Frames collected and uploaded every 6 to 8 meters — can be dynamically adjusted in certain regions.
Frequently asked questions about the Bee Membership solution
What’s included in a Bee Membership?
A Bee Membership includes:
One Bee LTE AI camera.
Activate LTE data plan.
Full access to the platform.
Can I use the Beekeeper software without Bee Membership?
Yes. You can purchase a Bee device and data plan separately, then connect them to Beekeeper.
Bee Membership just bundles everything for simplicity.
Does Bee Membership include a warranty?
Yes. Devices come with a standard manufacturer warranty of 1 year.
Extended protection may be available – contact support for options.
Do I need to configure the Bee device myself?
No. Each Bee device is:
Pre-installed with an active SIM.
Linked to your Beekeeper fleet account before shipping.
Ready to use out of the box.
How soon will my Bee device ship?
Devices typically ship within a few business days of purchase.
Do I need any technical experience to use Bee Membership?
No. Setup is plug-and-play. Managing devices via Beekeeper is simple and intuitive.
How much does Bee Membership cost?
$19 per device per month.
Requires a 24-month minimum commitment.
Can I cancel early?
No. Early cancellation is not allowed. The subscription runs for the full 24-month term.
What happens after 24 months?
Your subscription auto-renews for another 24-month term unless canceled before the renewal date.
Can I pause my Bee Membership?
No. Bee Memberships cannot be paused or put on hold.
Can I transfer a Membership to another person or organization?
No. Bee Memberships are non-transferable and tied to the original account.
What payment methods are accepted?
We accept major credit cards and standard billing methods.
Invoices are available in your Bee dashboard.
Can I add more devices later?
Yes. You can add more Bee devices anytime.
Each new device requires its own $19 / month Bee Membership.
Can multiple users manage the same fleet?
Yes. You can invite team members to your account and assign roles (e.g. admin, member).
Does Bee Membership include LTE data?
Yes. An always-on LTE data plan is included.
No separate SIM card required.
No overage charges.
What happens if my LTE data usage is high?
The included data plan is sufficient for normal fleet usage and mapping. You don’t need to monitor usage or worry about overages.
What if a device is lost or damaged?
Contact support.
Bee Membership does not cover loss or physical damage. See Terms of Service for details.
Is Bee Membership available internationally?
No. Currently available only in the United States and Puerto Rico.
Is support included?
Yes. Support includes:
Direct access to customer service.
Online documentation and guides.
What types of insights does Beekeeper provide?
Trip summaries.
Driver behavior reports.
Live location monitoring.
Map freshness updates.
Does the Bee device record video locally?
Yes. Each Bee can store up to 10 hours of video on-device.
How do I retrieve past footage?
You can request video from the Beekeeper dashboard for the past 10 hours of driving.
Can I use Bee Membership in areas without LTE coverage?
Bee devices continue recording even without LTE.
Once connectivity resumes, data uploads automatically.
Are Bee devices in a Bee Membership rewarded for mapping?
Yes. Bee devices earn HONEY rewards for growing coverage on Hivemapper.
Connect your wallet through the or directly in the Bee Maps App.
Video retrieval from past 10 hours.
Roadwork tracking and routing intelligence.

Spanish
Traditional Chinese
English
French
German
Korean
Portuguese
Simplified Chinese
Copy and save the Org ID.


From one API, access all available Map AI generated data.
Street-level imagery
Map Features like speed limit signs, turn restriction signs, and many more
The API Playground lets you interactively explore and test Bee Maps’ Developer APIs without leaving your browser. You can authenticate, define query geometry, retrieve map features or imagery, and view the live API responses – all in one place.
This is ideal for developers who want to experiment with the API before integration.
to your dashboard on Beemaps.com
From Bee Maps Dashboard, go to Developers → Playground
Click Get API Key
Enter coordinates (in [lon, lat] format) and a radius
API Key → Click Get API Key to automatically generate a key.
You can regenerate or clear it anytime by selecting Clear API Key.
There are multiple ways to specify your query area.
Point
Line
Polygon
Note: The format for coordinates is longitude first, not latitude/longitude. Example: [-122.413, 37.786]
(1) Point
Specify your query area.
Coordinates → Enter the center of the query area in [longitude, latitude] format.
Radius → The radius of your query circle in meters.
Example: 100 will query all data within 100 meters of the center point.
(2) Line
Coordinates → Enter the array of coordinates.
Buffer → The area in meters around the line path that you want to query, 50 meters is a healthy buffer for most use cases.
(3) Polygon
Coordinates → Enter the array of coordinate pairs for each point in the polygon.
Toggle this on to return map feature data such as:
Stop signs
Speed limits
Fire hydrants
Turn rules
Enable this to retrieve imagery data captured by Bee devices.
Azimuth → Specify camera direction in degrees (0–360°).
Example: 90 for east-facing imagery.
Tolerance → Enter the allowed directional variance in degrees.
Displays the generated curl command for your query. This includes:
API URL
Authentication header
Data type e.g. map features, imagery
Geometry
Below is an example response format that includes both map features and imagery.
ADAS (Advanced Driver Assistance Systems) Vehicle systems that use sensors, cameras, and AI to assist drivers with safety and navigation tasks (e.g., lane keeping, adaptive cruise control).
APN (Access Point Name) Configuration settings required for a SIM card to connect a Bee LTE device to a mobile carrier’s data network.
Auto-Mapping Feature of the Bee that begins mapping automatically when the vehicle powers on and GPS is locked, requiring no manual start.
Bee (Device) An AI camera device that looks like a dashcam but supports three use cases:
Commercial Fleet – Core part of Beekeeper fleet management.
Mapping – Collects real-time road imagery for the Hivemapper Network.
Edge AI – Runs AI models directly on the device for road feature detection.
Bee LTE A Bee model that uses a physical SIM card to connect via mobile networks, enabling autonomous data uploads without a phone.
Bee WiFi A Bee model that uploads data via trusted WiFi connections or through the Bee Maps mobile app.
Beekeeper Bee Maps’ fleet management platform that allows organizations to add/manage multiple Bees, monitor trips, trigger safety alerts, retrieve video remotely, and integrate via APIs.
Beekeeper APIs APIs designed for fleet managers to access device performance, trip data, and reward information across multiple Bees.
Beekeeper Rewards Weekly rewards (e.g., HONEY) earned by fleets, based on kilometers mapped and mount rating.
Clarity & Tilt (Mount Check) Parameters adjusted during Mount Check to ensure the Bee camera is aligned and producing usable imagery.
Data Upload The process by which mapping data is transferred from a Bee to the Hivemapper Network via LTE, WiFi, or the Bee Maps App.
Device SSID The Wi-Fi network name broadcasted by a Bee device (e.g., “dashcam-XXXX”), used for connecting via the Bee Maps App.
Dynamic Map Events Real-time road changes detected by Map AI, such as accidents, traffic slowdowns, or construction.
Edge AI Artificial Intelligence models deployed directly on Bee devices to detect road features, hazards, or events without needing cloud processing.
Edge Detections On-device AI recognitions of road features or events (e.g., stop signs, roadwork) processed before cloud upload.
Firmware Device-level software that controls Bee hardware. Bee LTE devices update firmware automatically via over-the-air (OTA) updates.
Firmware Version The identifier for the specific software build running on a Bee device, used to confirm if it is up to date.
GPS Lock The status when a Bee device has connected to satellites and can accurately determine location for mapping.
Hivemapper Network An open, decentralized global mapping network where contributors use Bee devices to collect road imagery, which is transformed into fresh map data.
Privacy Zone
Ability for mappers to set specific locations where no map data is collected with the Bee camera.
HONEY (Token) The reward unit earned on the Hivemapper Network when contributors upload usable road imagery.
Map AI Bee Maps’ automated system that converts crowdsourced street-level imagery into a structured map using deep learning (segmentation, detection, geolocation).
Map Features Specific road objects or attributes (e.g., speed limit signs, traffic lights, gas prices, roadwork) detected by Bee devices and accessible via the Map Features API.
Map Image API An API that delivers geolocated street-level imagery collected by Bee devices and the Hivemapper Network.
Mount Check A feature in the Bee Maps app that verifies whether a Bee device is mounted at the correct angle and position for high-quality mapping.
Mount Rating A quality score (star rating) given by the Bee Maps App based on how well the Bee is mounted for clear imagery.
Nano SIM The physical SIM card size required for Bee LTE devices (eSIMs not supported).
OBD-2 (On-Board Diagnostics Port) A standardized vehicle port used to power Bee devices via adapter, offering stable and continuous power.
Over-the-Air (OTA) Updates Wireless delivery of software and firmware updates to Bee devices, eliminating manual intervention.
SIM (Subscriber Identity Module) A physical Nano SIM card required by Bee LTE devices to connect to mobile networks.
Trip History Data logs of past journeys recorded by Bees and accessible via the Beekeeper platform or Fleet APIs.
Upload Modes Methods by which Bee devices upload collected data:
– Direct via mobile network.
– Through the paired mobile app using phone’s data/WiFi.
– Direct connection to a trusted WiFi network.
Usable Imagery High-quality, properly mounted road imagery collected by Bee devices that meets Hivemapper Network’s reward standards.
Usability Factors Conditions (such as mount position, clarity, tilt, and visibility) that determine whether imagery qualifies as usable.
Wallet A connected digital wallet—such as Breeze or Phantom—inside the Bee Maps App that securely links each user’s mapping contributions to their HONEY rewards.
Webhooks (for Beekeeper Fleets) Developer-triggered notifications for events such as harsh braking, trip starts, or device changes, enabling automation.
Do Not Enter Sign – Regulatory road sign indicating vehicles are prohibited from entering a roadway.
Fire Hydrants – Street-level objects detected by Bee devices, used for urban mapping and utility reference.
Gas Prices (Limited Coverage) – Detection of roadside gas station signs displaying fuel prices.
Highway Exit Signs – Signs marking highway exits, including exit number and location.
Intersection Traffic Lights – Traffic control devices located at intersections. Attributes include orientation, size, and number of lights.
Parking Restriction Signs – Regulatory signs that designate where parking is limited or prohibited.
Road Width – Measurements of road lanes or total road width derived from imagery.
Roadwork Construction – Detection of construction zones, equipment, or signs indicating roadwork.
Speed and Red-Light Cameras – Automated enforcement devices monitoring vehicle speed and compliance with red lights.
Speed Limit Signs – Signs that indicate maximum or minimum speed. Includes:
School zone speed limits
Construction zone limits
Truck-specific limits
EU zone start/end (minimum and maximum)
Stop Signs – Regulatory signs requiring vehicles to stop at intersections.
Toll Prices – Detection of signs showing toll rates (e.g., bridges, highways).
Turn Restriction Signs – Regulatory signs restricting vehicle maneuvers. Includes:
No left turn
No right turn
No right turn on red
No U-turn
Vertical Height Restrictions – Signs indicating clearance limits for tall vehicles (e.g., bridges, tunnels).
Fleet Data APIs – Access to trip history, driver profiles, device status, and performance data.
Fleet Webhooks – Real-time event notifications (e.g., harsh braking, trip starts, device changes).
Hive-Py – A Python wrapper for Bee Maps APIs (Map Image API, Map Features API).
Map Features API – API that provides access to structured road features (e.g., speed limits, traffic signs) detected by Bee devices.
Map Image API – API for retrieving geolocated street-level imagery from Bee devices and the Hivemapper Network.
Reward API (Beekeeper) – Endpoint to retrieve weekly reward summaries for fleet devices.
Schema (Map Features) – JSON-based data structure describing map feature attributes (id, object class, coordinates, confidence, timestamps, etc.).
> python -m imagery.query
usage: query.py [-h] -i INPUT_FILE [-s START_DAY] [-e END_DAY] [-L] [-x] [-d MAX_DIST] [-l MAX_LAG] [-z MAX_ANGLE] -o OUTPUT_DIR [-g] [-w WIDTH] [-M]
                [-I CUSTOM_ID_FIELD] [-S CUSTOM_MIN_DATE_FIELD] [-k] [-E] [-K SKIP_GEO_FILE] [-P IMAGE_POST_PROCESSING] -a AUTHORIZATION [-c NUM_THREADS] [-v]
                [-C] [-b] [-N]
Time-based restrictions
Bee Maps provides a suite of developer tools to integrate real-world data, AI, and fleet intelligence directly into your own systems. With a single account, you can access APIs and webhooks that cover everything from trip and driver data to high-resolution map imagery and edge AI detections.
Whether you’re building dashboards, enhancing mapping applications, or automating workflows, Bee Maps APIs make it simple to pull in data or trigger actions in real time.
What you can access:
Fleet Data APIs → Access trip history, driver profiles, device status, and performance metrics.
Fleet Webhooks → Get instant alerts for events like harsh braking, trip starts, or device changes.
Mapping APIs → Retrieve map imagery, road features, and geospatial data for your applications.
Bee Edge AI → Leverage AI-powered detections at the edge to identify road features and safety events.
Map Image API → Generate on-demand static or dynamic map images for your tools and dashboards.
Need to review our Terms of Service?
Bee Terms of Service: Terms of Service for Bee devices
Bee Membership Terms of Service: Terms of Service for Bee Membership
Mapping Network Terms of Service: Terms of Service for Hivemapper's Mapping Network
Retrieve Imagery or Retrieve Map Features as neededClick Submit to see results in the response panel
You can view geometry examples by clicking Examples beside the Geometry title.
Traffic lights
Minimum Week → Lets you filter by the most recent data week available.


curl -X POST 'https://beemaps.com/api/developer/map-data?apiKey=dce5a9af-73f7-4535-baa7-176f075f3c6f' \
-H 'Content-Type: application/json' \
--data '{
  "type": [
    "imagery",
    "mapFeatures"
  ],
  "geometry": {
    "type": "Point",
    "coordinates": [
      -122.39207881646443,
      37.78190506177117
    ],
    "radius": 250
  }
}'{
"totalCreditsUsed": 30,
"totalCreditsRemaining": -138430,
"mapFeatureResults": {
"type": "mapFeatures",
"data": [
{
"id": "688f87fbb151a8600e3c0496",
"status": "active",
"properties": {
"turnRules": "no_right_turn"
},
"position": {
"lon": -122.40995306137654,
"lat": 37.77042290263696,
"azimuth": 319.7009206758463,
"alt": -27.013788732394367,
"size": {
"width": 0.6542170893518451,
"height": 0.7926537705707328,
"units": "m"
}
},
"observed": {
"firstSeen": "2025-08-03T15:45:47.281Z",
"lastSeen": "2025-08-03T15:45:47.281Z"
},
"confidence": 0.20957326668368817,
"class": "turn-restriction-sign",
"n_detections": 1,
"url": "https://network-sandbox-processed-data.s3.us-west-2.amazonaws.com/68c89d9dc645f0a79608feaf/keyframes/98.jpg",
"x": 0.6723372781065089,
"y": 0.45068359375,
"w": 0.02021696252465483,
"h": 0.0419921875
}
],
"creditsUsed": 5
},
"imageryResults": {
"type": "imagery",
"data": [
{
"url": "https://network-sandbox-processed-data.s3.us-west-2.amazonaws.com/6917a40173e090b74632a03a/keyframes/82.jpg",
"timestamp": "2025-11-14T19:45:33.853Z",
"sequence": "6917The Bee Maps app includes a Settings menu where you can customize your experience and manage your account.
From the Settings menu, you can manage:
Profile → Update your account details, wallet connection, and review your mount rating.
Bee → View and configure your Bee device connection.
Data → Manage upload mode and review data uploads.

App → View app version.
Map Style → Choose how maps are displayed in the app.
Privacy → Set up your Privacy Zones, Trip Trimming, and review Legal Placards.
Last Updated: April 3, 2024
These Terms of Service constitute a legally binding agreement (the “ Agreement”) between you and Hivemapper, Inc., its parents, subsidiaries, representatives, affiliates, officers and directors (collectively, “Hivemapper,” “we,” “us” or “our”) governing your use of the beemaps.com website (the “Site”), the Hivemapper Mapping Platform (the “Software”), Hivemapper’s proprietary map (the “Map”), the Hivemapper mobile Application (the “App”), the Hivemapper Dashcam (the “Dashcam”) and Hivemapper’s Map Explorer (collectively, the “Services”). Products derived from Mapping Platform data (“Map Products”) are governed by separate Terms and Conditions, which are available here. Your use of the Services is subject to this Agreement which may be updated from time to time. Any other links or references provided in this Agreement are for informational use only and are not part of the Agreement. Please read this Agreement carefully and make sure you understand it. If you do not understand the Agreement, or do not accept any part of it, then you may not use any part of the Services.
Hivemapper may modify this Agreement from time to time. If fundamental changes are introduced, a notice will be posted in the updated version of the Software and App as well as on the Site. By continuing to use or access the Services after the updates come into effect, you agree to be bound by the revised Agreement.
The content on the Services includes maps, videos, images, photos, location information, branding (including trade names, trademarks, service marks, or logos), and other materials and data whether provided by you, Hivemapper or a third-party (collectively, "Content”). Content is the responsibility of the person or entity that provides it to the Services. Hivemapper is under no obligation to host or serve Content. If you see any Content you believe does not comply with this Agreement, including by violating the law or by misrepresenting map data, you can report it to us.
You must be at least 13 years old to use the Services. If you are under 18, you represent that you have your parent or guardian’s permission to use the Services. Please have them read this Agreement with you. If you are a parent or legal guardian of a user under the age of 18, by allowing your child to use the Services, you are subject to the terms of this Agreement and responsible for your child’s activity on the Services. If you are using the Services on behalf of a company or organization, you represent that you have authority to act on behalf of that entity, and that such entity accepts this Agreement.
Contributors to the Hivemapper Network will earn HONEY rewards as detailed in the company's “How It Works” document. Hivemapper does not guarantee that you will earn any HONEY tokens. Furthermore, HONEY tokens may have no value, and Hivemapper makes no promises or warranties as to the value of HONEY tokens.
Additionally, only original and authentic map content collected at a verifiable location will qualify for rewards. Any falsified or non-original content will not qualify and may result in banishment from the Service. HONEY rewards made to Contributors for map content that is later found to be in breach of this Agreement will be due back to Hivemapper, and will be automatically deducted from future rewards due.
Customers use the Map Data Console to access Map Products derived from Mapping Network data. To use Map Products, customers must complete an order form and agree to the Master Subscription Agreement Terms and Conditions, available
API
The Hivemapper API is used by customers to gain access to derived content. In order to use the Hivemapper API a customer must complete the order form.
Your Information
Our explains what information we collect and how we treat your personal data and protect your privacy when you use the Services.
There are certain types of conduct that are strictly prohibited on the Services. Please read the following restrictions carefully. Your failure to comply with the provisions set forth below may result (at Hivemapper’s sole discretion) in the termination of your access to the Services and may also expose you to civil and/or criminal liability.
You may not, whether yourself or through any other means or person:
(1) copy, modify, adapt, translate, reverse engineer, decompile, or disassemble any portion of the Content included in the Services and/or Site, or in any way or publicly display, perform, or distribute them;
(2) make any use of the Content on any other website or networked computer environment for any purpose, or replicate or copy the Content without without an Order Form with Hivemapper in place and subject to those terms;
(3) create a browser or border environment around the Content (e.g. no frames or inline linking);
(4) transmit or otherwise make available in connection with the Services and/or Site any virus, worm, Trojan Horse, time bomb, web bug, spyware, or any other computer code, file, or program that may or is intended to damage or hijack the operation of any hardware, software, or telecommunications equipment, or any other actually or potentially harmful, disruptive, or invasive code or component;
(5) interfere with or disrupt the operation of the Services and/or Site, or the servers or networks that host the Services and/or Site or make the Services and/or Site available, or disobey any requirements, procedures, policies, or regulations of such servers or networks;
(6) sell, license, or exploit for any commercial purposes any use of or access to the Content and/or the Service and/or Site without an Order Form with Hivemapper in place and subject to those terms;
(7) create a database by systematically downloading and storing all or any of the Content from the Service and/or Site without an Order Form with Hivemapper in place and subject to those terms;
(8) forward any Content from the Services and/or Site without an Order Form with Hivemapper in place and subject to those terms;
(9) transfer or assign your Services accounts’ password, even temporarily, to a third party;
(10) use the Services and/or Site for any illegal or unauthorized purpose;
(11) infringe or violate any of this Agreement
(12) directly or indirectly, use Hivemapper (or any product offered by Hivemapper from time to time) to track the location of any person (or property owned or used by that person) without that person’s consent.
If you have a Hivemapper account, you may be able to upload Content to the Services. If you choose to upload Contributor Content, you attest to its locational accuracy and content authenticity. Additionally, you must not submit to the Services any Content that does not comply with this Agreement or the law. For example, the Content you submit must not include third-party intellectual property (such as copyrighted material) unless you have permission from that party or are otherwise legally entitled to do so. You are legally responsible for your Contributor Content. Content can include, for example, dashcam video, still images, GPS information, etc. You assume sole responsibility for any Content you post and you alone are liable for the consequences when you post Content.
It is strictly forbidden to knowingly submit Content that inaccurately portrays any location. It is also forbidden to submit Content of a commercial nature (including advertising), unless such Content pertains to Hivemapper or the Services, and such Content strictly complies with these Terms.
Additionally, when you submit Contributor Content, you must make sure it is lawful. For example, you may not submit Content that:
(1) is manipulated in any manner that would lead to an incorrect map;
(2) attempts to trick people by providing false, incomplete, or manipulated content;
(3) is knowingly not collected at the location it claims to be at;
(4) attempts to reveal the identify other persons;
The foregoing examples of unlawful Content are made solely for illustrative purposes and do not constitute an exhaustive list of restricted Content.
Hivemapper may decline to publish, or immediately delete any Contributor Content you submit if you or the Content have violated this Agreement or if you engaged in a commission or omission that is harmful or may be harmful to the Services, its Users, Hivemapper or any of its agents or affiliates. In such cases, Hivemapper may also terminate your access to the Services or prevent you from posting additional Content on the Services. The provisions of this clause are made in addition to any rights afforded to Hivemapper by any law.
Contributor Content does not reflect the views of Hivemapper. Publishing or processing Contributor Content does not warrant its validity, reliability, accuracy, legality or it being up-to-date.
“Generated Content” means both: (1) the Content resulting from the processing from the Software and available to view on the website (“Map Content”); and (2) the corresponding data returned through the Hivemapper Map Data Console (“Map Products”). Except as expressly permitted to Customers who have a signed Order Form with Hivemapper, Users are allowed only to view and search Generated Content and are not permitted to download, export, copy, manipulate or mine any Generated Content.
Hivemapper and/or third parties retain ownership and/or other applicable rights in all Generated Content and all Content other than Contributor Content.
When you submit Contributor Content, you represent and warrant that you own all intellectual property rights in the Content; that you are permitted to publish the Content and to permit Hivemapper to use the Content and exploit all intellectual property rights in and to the Content. Hivemapper receives no ownership rights in and to your Contributor Content. However, by submitting Content to Hivemapper, you hereby grant Hivemapper an irrevocable, worldwide, perpetual, non-exclusive, royalty-free, sub-licenseable and transferable license to use, copy, distribute, and prepare derivative works from the Content. The license granted to Hivemapper in and to the Content you submit is not limited to personal use, but also extends to any commercial use of Content, at Hivemapper’s sole and absolute discretion. Other Users will not have access to your Contributor Content, though we reserve the right to change this in the future, in which case we will notify you prior to making your Content publicly available.
You may request to remove your Content from Hivemapper at any time, but removing such will not affect the Generated Content already created from your Content.
Hivemapper reserves the right to remove any Contributor Content that is found to be in breach of this Agreement.
As between the parties, Hivemapper owns and retains all right, title and interest in and to all of the Products, all improvements, modifications and derivative works of the foregoing, and all intellectual property rights in any of the foregoing. To the extent that Customer acquires any right, title or interest in or to any Product (including without limitation the Service), any deliverable, or any intellectual property rights therein, Customer hereby assigns to Hivemapper all such right, title and interest. Except for the licenses Hivemapper expressly grants to Customer hereunder, Customer is not provided with any license or right to the Products or the intellectual property rights therein, whether by implication, estoppel or otherwise. Customer is not granted any right to use any Hivemapper trademark, service mark, logo or trade name.
Contributors and Customer, its authorized users and its other employees and agents may (but are not required to) provide Hivemapper with suggestions, comments or other feedback regarding the Products ("Feedback"). If Customer, its authorized users or its other employees and agents do provide Hivemapper with Feedback, then Hivemapper may, and you hereby grant Hivemapper a license to, freely use, disclose, reproduce, license, distribute and otherwise commercially exploit such Feedback in connection with any product, technology, service, specification or other documentation.
You may terminate your use of the Services at any time and for whatever reason. You are not obligated to advise Hivemapper of such termination. To delete your Hivemapper account and your personal information contained in the account, you may complete the account deletion process from the settings tab of the Hivemapper App. On receiving such a request, Hivemapper will use reasonable efforts to delete such information, however please note that information may not be deleted immediately from our back-up systems. When deleting your account, unless as a result from legal proceedings or obligations, Hivemapper will retain and continue to use the Generated Content that was created from Content you provided to Hivemapper.
If not specified in an Order Form, Hivemapper retains the right to block your access to the Services and discontinue your use of the Services, at any time and for any reason Hivemapper deems appropriate, at its sole and absolute discretion.
We will notify you with the reason for termination by Hivemapper unless we reasonably believe that to do so: (a) would violate the law or the direction of a legal enforcement authority, or would otherwise risk legal liability for Hivemapper; (b) would compromise an investigation or the integrity or operation of the Services; or (c) would cause harm to any user, other third party or Hivemapper. Where Hivemapper is terminating your access for Services changes, where reasonably possible, you will be provided with sufficient time to export your Content from the Services.
If your Hivemapper account is terminated, you may continue using certain aspects of the Services (such as viewing only) without an account, and this Agreement will continue to apply to such use. If you believe your Hivemapper account has been terminated in error, you can appeal by contacting us.
If Hivemapper is unable to perform any of its obligations under this Agreement because of severe weather, natural disasters, acts of God, riots, wars, theft, governmental action, acts of our suppliers, or other events beyond our reasonable control, then we are relieved from our performance of such obligations to the extent, and for the duration, that such performance is prevented by such events.
You represent and warrant that: (i) you are not located in a country that is subject to a U.S. Government embargo, or that has been designated by the U.S. Government as a “terrorist supporting” country; and (ii) you are not listed on any U.S. Government list of prohibited or restricted parties. Hivemapper does not ship dashcams to such countries and does not allow residents of such countries to access Map Products.
OTHER THAN AS EXPRESSLY STATED IN THIS AGREEMENT OR AS REQUIRED BY LAW, THE SERVICES ARE PROVIDED “AS IS” AND HIVEMAPPER DOES NOT MAKE ANY SPECIFIC COMMITMENTS OR WARRANTIES ABOUT THE SERVICES. FOR EXAMPLE, WE DON’T MAKE ANY WARRANTIES ABOUT: (A) THE CONTENT PROVIDED THROUGH THE SERVICES; (B) THE SPECIFIC FEATURES OF THE SERVICES, OR ITS ACCURACY, RELIABILITY, AVAILABILITY, OR ABILITY TO MEET YOUR NEEDS; OR (C) THAT ANY CONTENT YOU SUBMIT WILL BE ACCESSIBLE ON THE SERVICES.
EXCEPT AS REQUIRED BY APPLICABLE LAW, HIVEMAPPER, ITS AFFILIATES, OFFICERS, DIRECTORS, EMPLOYEES AND AGENTS WILL NOT BE RESPONSIBLE FOR ANY LOSS OF PROFITS, REVENUES, BUSINESS OPPORTUNITIES, GOODWILL, OR ANTICIPATED SAVINGS; LOSS OR CORRUPTION OF DATA; INDIRECT OR CONSEQUENTIAL LOSS; PUNITIVE DAMAGES CAUSED BY:
ERRORS, MISTAKES, OR INACCURACIES ON THE SERVICES;
PERSONAL INJURY OR PROPERTY DAMAGE RESULTING FROM YOUR USE OF THE SERVICES;
ANY UNAUTHORIZED ACCESS TO OR USE OF THE SERVICES;
ANY INTERRUPTION OR CESSATION OF THE SERVICES;
THIS PROVISION APPLIES TO ANY CLAIM, REGARDLESS OF WHETHER THE CLAIM ASSERTED IS BASED ON WARRANTY, CONTRACT, TORT, OR ANY OTHER LEGAL THEORY.
HIVEMAPPER AND ITS AFFILIATES’ TOTAL LIABILITY FOR ANY CLAIMS ARISING FROM OR RELATING TO THE SERVICES IS LIMITED TO THE GREATER OF: (A) THE AMOUNT OF REVENUE THAT HIVEMAPPER HAS PAID TO YOU FROM YOUR USE OF THE SERVICES IN THE 12 MONTHS BEFORE THE DATE OF YOUR NOTICE, IN WRITING TO HIVEMAPPER, OF THE CLAIM; AND (B) USD $500.
To the extent permitted by applicable law, you agree to defend, indemnify and hold harmless Hivemapper, its Affiliates, officers, directors, employees and agents, from and against any and all claims, damages, obligations, losses, liabilities, costs or debt, and expenses (including but not limited to attorney's fees) arising from: (i) your use of and access to the Services; (ii) your violation of any term of this Agreement; (iii) your violation of any third party right, including without limitation any copyright, property, or privacy right; or (iv) any claim that your Content caused damage to a third party. This defense and indemnification obligation will survive this Agreement and your use of the Services.
The Services may require or recommend third party online services that are not owned or controlled by Hivemapper. Hivemapper has no control over, and assumes no responsibility for, such websites and online services. Be aware when you leave the Services; we suggest you read the terms and privacy policy of each third-party website and online service that you visit.
Unless expressly prohibited in an Order Form with you, Hivemapper may, either partially or in its entirety and without being obligated to provide prior notice – modify, adapt or change the Software, the Service’s features, the user interface and design, the extent and availability of the Content in the Services and any other aspect related to the Services. Unless permitted in an Order Form with you, you will have no claim, complaint or demand against Hivemapper for applying such changes or for failures incidental to such changes.
All claims arising out of or relating to this Agreement or the Services will be governed by California law, without regard to conflict of law rules and will be litigated exclusively in the federal or state courts of San Francisco County, California, USA. You and Hivemapper consent to personal jurisdiction in those courts.
You may not assign or transfer your rights in and to the Services, without the prior written consent of Hivemapper. Hivemapper may assign its rights in and to the Services to a third party at its sole and absolute discretion, provided that the third party undertakes Hivemapper’s obligations to you under this Agreement.
These Terms, together with the policies that are an integral part of these Terms, namely the Privacy Policy, shall all constitute the entire and complete agreement between you and Hivemapper concerning the Hivemapper Services. In the event of an inconsistency between this Agreement and the synopsis of terms presented to the user during Software installation, these Terms shall prevail.
As a Contributor to the Hivemapper Platform, you acknowledge and agree that you and Hivemapper are in a direct business relationship, and the relationship between the parties under this Agreement is solely that of independent contracting parties. You and Hivemapper expressly agree that (1) this is not an employment agreement and does not create an employment relationship between you and Hivemapper; and (2) no joint venture, franchisor-franchisee, partnership, or agency relationship is intended or created by this Agreement. You have no authority to bind Hivemapper, and you undertake not to hold yourself out as an employee, agent or authorized representative of Hivemapper.
You may contact us with any question about the Services through email at We will make our best efforts to address your inquiry promptly.
Last Updated: September 20, 2025
1.1 The Services. Subject to the terms of this Agreement, Beemaps will use commercially reasonable efforts to provide Customer (a) the Services solely for Customer’s internal business operations in accordance with the terms and limitations of each Order Form and (b) reasonable support services, through electronic mail or another online mechanism, in accordance with Beemaps’ standard practice. As part of the Services, Hivemapper may provide Customer with certain application programming interfaces (APIs), scripts, data import tools, or other software available to Customer as part of its use of the Services and/or access to the Services, as applicable. Customer may permit Users to use the Services on its behalf. Customer is responsible for provisioning and managing its User accounts, for its Users’ actions through the Services and for their compliance with this Agreement. Capitalized terms not defined herein shall be given the meaning set forth in the applicable Order Form.
1.2 Ownership of Devices. Beemaps shall retain full title to and ownership of each Devices unit, and Customer shall (a) keep the Devices units free and clear from any legal process, liens or encumbrances whatsoever; and (b) maintain the Devices units in good condition and be responsible for any damage to or loss of such Devices units that occurs while in Customer’s possession (reasonable wear and tear excepted) up to the $589 replacement cost if any such unit is damaged beyond repair or lost. On termination (by expiration or otherwise), Customer, at Customer’s sole cost and expense, shall de-install the Devices and prepare the Devices for return to Beemaps. Customer, pursuant to Beemaps’ instructions and at Customer’s sole cost and expense (including, but not limited to, expenses of transportation and in-transit insurance), shall return the Devices to Beemaps in the same operating order, repair, condition, and appearance as when received, except for normal depreciation and wear and tear.
1.3 Grant of License. With respect to any software in any form (including software embedded in Devices) that is provided to Customer or deployed on Customer premises (“Software”), Beemaps hereby grants Customer, during the Term (as defined below), a non-exclusive, non-transferable, non-sublicensable license to use such Software solely internally in connection with the Services and for no other purpose. All Software is Confidential Information of Beemaps and subject to the terms of Section 3.
1.4 API Changes. Customer acknowledges that Hivemapper may change, deprecate or republish the APIs for the Hivemapper Product or feature of the Services from time to time, and that it is Customer’s responsibility to ensure that calls or requests Customer makes to the Hivemapper Product are compatible with then-current APIs for the Hivemapper Product. Although Hivemapper endeavors to avoid changes to its APIs or Services that are not backwards compatible, if any such changes become necessary Hivemapper will endeavor to notify Customer at least thirty (30) days prior to Hivemapper‘s implementation of any such incompatible changes to the Services of which it becomes aware. In the event Hivemapper modifies or updates the Services (including APIs), Hivemapper may require that Customer to use the most current version of the Services (subject to the provision above).
1.5 Installation. Customer will be solely responsible for the installation, mounting, and placement of each Device, and assumes all responsibility and liability arising from or related to such installation, mounting, or placement, including compliance with all applicable laws, rules, and regulations. Provider will have no responsibility for, and disclaims all liability arising from, Customer’s installation, mounting, or placement of any Device.
2.1 Use Restrictions. Customer will only use the Services as expressly permitted herein and in the applicable Order Form and agrees that it will not, directly or indirectly: reverse engineer, decompile, disassemble or otherwise attempt to discover the source code, object code or underlying structure, ideas, know-how or algorithms relevant to the Services, Devices or any Software related to the Services; modify, translate, or create derivative works based on the Services, Devices or any Software, documentation or data relevant to the Services (except to the extent expressly permitted by Beemaps or authorized within the Services); use the Services, Devices or any Software for timesharing or service bureau purposes or otherwise for the benefit of any third party; use or access the Services, Devices or the Software (or any related information or documentation) to develop a product or service that is competitive with the Services or engage in competitive analysis or benchmarking; remove any proprietary notices or labels; or modify, adapt or hack the Services, Software or Devices, or otherwise attempt to gain unauthorized access to the Service or its related systems or networks.
2.2 Customer Obligations. Customer represents, covenants, and warrants that Customer will use the Services only in compliance with Beemaps’ standard published policies and codes of conduct then in effect and all applicable laws and regulations (including, without limitation, those relevant to privacy, spam, intellectual property and the like). Customer hereby agrees to indemnify and hold harmless Beemaps against any damages, losses, liabilities, settlements and expenses (including without limitation costs and attorneys’ fees) in connection with any claim or action that arises from an alleged violation of any of the foregoing or otherwise from Customer’s use of Services. Although Beemaps has no obligation to monitor Customer’s use of the Services, Beemaps may do so and may prohibit any use of the Services (or disable content or data) it believes may be (or alleged to be) in violation of the foregoing or any other term of this Agreement.
2.3 LTE Data Usage; Throttling. Customer acknowledges and agrees that each Device provided by Beemaps may include LTE or other cellular connectivity. Beemaps will pay for such connectivity subject to the terms of this Agreement. Customer further acknowledges and agrees that LTE data usage by the Devices is subject to reasonable limitations, and Beemaps reserves the right, in its sole discretion, to monitor data consumption and to throttle, restrict, or suspend LTE connectivity for any Device that Beemaps determines has engaged in excessive, abusive, or abnormal usage patterns. Without limiting the foregoing, excessive usage may include continuous or near-continuous operation, shared or pooled use among multiple individuals, or any usage inconsistent with ordinary operation of the Services. Beemaps will not be liable to Customer for any loss of functionality, performance degradation, or other consequences resulting from such throttling, restriction, or suspension
2.4 Optional Wallet Connection and Rewards. Certain features of the Services may permit a customer to connect a compatible digital wallet. If Customer elects to connect such a wallet, Customer may accrue and receive applicable rewards associated with use of the Devices and Services. If Customer does not connect a wallet, no rewards will be issued, and any unclaimed rewards will be permanently forfeited. Provider will have no obligation to credit, hold, or otherwise account for any such forfeited rewards.
2.5 Equipment. Customer shall be responsible for obtaining and maintaining any equipment and ancillary services needed to connect to, access or otherwise use the Services, including, without limitation, inventory tags, modems, hardware, servers, software, operating systems, networking, web servers and the like (collectively, “Equipment”). Customer shall also be responsible for maintaining the security of the Equipment, Customer account, passwords (including but not limited to administrative and user passwords) and files, and for all uses of Customer account or the Equipment with or without Customer’s knowledge or consent.
3.1 Confidential Information. Each party (the “Receiving Party”) understands that the other party (the “Disclosing Party”) has disclosed or may disclose business, technical or financial information relating to the Disclosing Party’s business (hereinafter referred to as “Proprietary Information” of the Disclosing Party). Proprietary Information of Beemaps includes all Software and other non-public information regarding features, functionality and performance of the Service and Devices. Proprietary Information of Customer includes data uploaded to the Service by Customer or that is collected or produced for Customer by Beemaps in the provision of the Service (“Customer Data”). The Receiving Party agrees: (i) to take reasonable precautions to protect such Proprietary Information, and (ii) not to use (except in performance of the Services or as otherwise permitted herein) or divulge to any third person any such Proprietary Information. The Disclosing Party agrees that the foregoing shall not apply with respect to any information after five (5) years following the disclosure thereof or any information that the Receiving Party can document (a) is or becomes generally available to the public, or (b) was in its possession or known by it prior to receipt from the Disclosing Party, or (c) was rightfully disclosed to it without restriction by a third party, or (d) was independently developed without use of any Proprietary Information of the Disclosing Party or (e) is required to be disclosed by law.
3.2 Proprietary Rights. Customer shall own and retain all right, title and interest in and to all Customer Data. Beemaps shall own and retain all right, title and interest in and to (a) the Services, Devices and Software, and all improvements, enhancements or modifications thereto, (b) any software, applications, inventions or other technology developed in connection with Services, Professional Services or support, and (c) all intellectual property rights related to any of the foregoing.
3.3 Analytics Data. Notwithstanding anything to the contrary, Beemaps shall have the right collect and analyze data and information relating to the use and performance of various aspects of the Services, Devices and related technologies, and Beemaps will be free (during and after the term hereof) to (i) use such information and data to provide, improve and enhance the Services and other Beemaps offerings, and (ii) disclose such data solely in aggregate or other de-identified form in connection with its business. Further, Beemaps shall have the right to use Customer’s name in a factual manner for marketing or promotional purposes on Beemaps’ website and in other communication with existing or potential Beemaps customers. To decline Beemaps this right, Customer must email Beemaps (at the email address provided in the Service) stating that Customer does not wish to grant Beemaps this right. No rights or licenses are granted except as expressly set forth herein.
4.1 Services Fees. Customer will pay Beemaps the then applicable fees described in each applicable Order Form (and each SOW) for the Services and Professional Services in accordance with the terms therein (the “Fees”). If Customer’s use of the Services exceeds the Service Zones set forth on the Order Form or otherwise requires the payment of additional fees (per the terms of this Agreement), Customer shall be billed for such usage and Customer agrees to pay the additional fees in the manner provided herein. Beemaps reserves the right to change the Fees or applicable charges and to institute new charges and Fees at the end of the Initial Service Term or thencurrent renewal term, upon thirty (30) days prior notice to Customer (which may be sent by email). If Customer believes that Beemaps has billed Customer incorrectly, Customer must contact Beemaps no later than 60 days after the closing date on the first billing statement in which the error or problem appeared, in order to receive an adjustment or credit. Inquiries should be directed to Beemaps’ customer support department.
4.2 Payment Terms. Beemaps may choose to bill through an invoice, in which case, full payment for invoices issued in any given month must be received by Beemaps thirty (30) days after the mailing date of the invoice. Unpaid amounts are subject to a finance charge of 1.5% per month on any outstanding balance, or the maximum permitted by law, whichever is lower, plus all expenses of collection and may result in immediate termination of Service. Customer shall be responsible for all taxes associated with Services other than U.S. taxes based on Beemaps’ net income.
5.1 Term. Subject to earlier termination as provided below, this Agreement is for the Initial Service Term as specified in the Order Form, and shall be automatically renewed for additional periods of the same duration as the Initial Service Term (collectively, the “Term”), unless either party provides written notice of non-renewal at least sixty (60) days prior to the end of the then-current term.
5.2 Termination. In addition to any other remedies it may have, either party may also terminate this Agreement upon thirty (30) days’ notice (or without notice in the case of nonpayment), if the other party materially breaches any of the terms or conditions of this Agreement. Beemaps may also reasonably suspend Customer’s and/or any users’ access to Services at any time in its reasonable discretion if it possesses a good faith belief that Customer’s use of the Service may be in violation of this Agreement or otherwise place Beemaps (or its customers or other interests) at risk of harm, damage, loss or liability. Upon termination, Customer’s right to use the Services shall immediate terminate, all outstanding Fees due for the Services for the entire Term (regardless of any early termination) shall immediately become due and payable, Customer shall return the Devices to Beemaps and shall return (or at Beemaps’ option destroy) all Software, and each party shall return to the other all Proprietary Information. All sections of this Agreement which by their nature should survive termination will survive termination, including, without limitation, all rights to payment of Fees, confidentiality obligations, warranty disclaimers, and limitations of liability.
Beemaps shall use reasonable efforts consistent with prevailing industry standards to maintain the Services in a manner which minimizes errors and interruptions in the Services and shall perform the Professional Services in a professional and workmanlike manner. Services may be temporarily unavailable for scheduled maintenance or for unscheduled emergency maintenance, either by Beemaps or by third-party providers, or because of other causes beyond Beemaps’ reasonable control, but Beemaps shall use reasonable efforts to provide advance notice in writing or by e-mail of any scheduled service disruption. HOWEVER, BEEMAPS DOES NOT WARRANT THAT THE SERVICES WILL BE UNINTERRUPTED OR ERROR FREE; NOR DOES IT MAKE ANY WARRANTY AS TO THE RESULTS THAT MAY BE OBTAINED FROM USE OF THE SERVICES. EXCEPT AS EXPRESSLY SET FORTH IN THIS SECTION, THE SERVICES AND PROFESSIONAL SERVICES ARE PROVIDED “AS IS” AND BEEMAPS DISCLAIMS ALL WARRANTIES, EXPRESS OR IMPLIED, INCLUDING, BUT NOT LIMITED TO, IMPLIED WARRANTIES OF MERCHANTABILITY AND FITNESS FOR A PARTICULAR PURPOSE AND NONINFRINGEMENT.
NOTWITHSTANDING ANYTHING TO THE CONTRARY, EXCEPT IN CONNECTION WITH A BREACH OF SECTION 2.1, NEITHER PARTY NOR ITS SUPPLIERS (INCLUDING BUT NOT LIMITED TO ALL DEVICES AND TECHNOLOGY SUPPLIERS), OFFICERS, AFFILIATES, REPRESENTATIVES, CONTRACTORS OR EMPLOYEES SHALL BE RESPONSIBLE OR LIABLE TO THE OTHER PARTY WITH RESPECT TO ANY SUBJECT MATTER OF THIS AGREEMENT OR TERMS AND CONDITIONS RELATED THERETO UNDER ANY CONTRACT, NEGLIGENCE, STRICT LIABILITY OR OTHER THEORY: (A) FOR ERROR OR INTERRUPTION OF USE OR FOR LOSS OR INACCURACY OR CORRUPTION OF DATA OR COST OF PROCUREMENT OF SUBSTITUTE GOODS, SERVICES OR TECHNOLOGY OR LOSS OF BUSINESS; (B) FOR ANY INDIRECT, EXEMPLARY, INCIDENTAL, SPECIAL OR CONSEQUENTIAL DAMAGES; (C) FOR ANY MATTER BEYOND ITS REASONABLE CONTROL; OR (D) FOR ANY AMOUNTS THAT, TOGETHER WITH AMOUNTS ASSOCIATED WITH ALL OTHER CLAIMS, EXCEED THE FEES PAID BY CUSTOMER TO BEEMAPS FOR THE SERVICES UNDER THIS AGREEMENT IN THE 12 MONTHS PRIOR TO THE ACT THAT GAVE RISE TO THE LIABILITY (PLUS, IN THE CASE OF CUSTOMER, ANY AMOUNTS DUE HEREUNDER), IN EACH CASE, WHETHER OR NOT BEEMAPS OR THE CUSTOMER HAS BEEN ADVISED OF THE POSSIBILITY OF SUCH DAMAGES.
8.1 Customer may not remove or export from the United States or allow the export or re-export of the Services, Software or anything related thereto, or any direct product thereof in violation of any restrictions, laws or regulations of the United States Department of Commerce, the United States Department of Treasury Office of Foreign Assets Control, or any other United States or foreign agency or authority. As defined in FAR section 2.101, the Software and documentation are “commercial items” and according to DFAR section 252.2277014(a)(1) and (5) are deemed to be “commercial computer software” and “commercial computer software documentation.” Consistent with DFAR section 227.7202 and FAR section 12.212, any use modification, reproduction, release, performance, display, or disclosure of such commercial software or commercial software documentation by the U.S. Government will be governed solely by the terms of this Agreement and will be prohibited except to the extent expressly permitted by the terms of this Agreement.
If any provision of this Agreement is found to be unenforceable or invalid, that provision will be limited or eliminated to the minimum extent necessary so that this Agreement will otherwise remain in full force and effect and enforceable. This Agreement is not assignable, transferable or sublicensable by Customer except with Beemaps’ prior written consent. Beemaps may transfer and assign any of its rights and obligations under this Agreement without consent. Beemaps may also use subcontractors in performance of certain aspects of the Services, but Beemaps shall remain responsible for the performance of the Services in accordance with the terms hereof. This Agreement is the complete and exclusive statement of the mutual understanding of the parties and supersedes and cancels all previous written and oral agreements, communications and other understandings relating to the subject matter of this Agreement, and all waivers and modifications must be in a writing signed by both parties, except as otherwise provided herein. No agency, partnership, joint venture, or employment is created as a result of this Agreement and Customer does not have any authority of any kind to bind Beemaps in any respect whatsoever. In any action or proceeding to enforce rights under this Agreement, the prevailing party will be entitled to recover costs and attorneys’ fees. All notices under this Agreement will be in writing and will be deemed to have been duly given when received, if personally delivered; when receipt is electronically confirmed, if transmitted by facsimile or e-mail; the day after it is sent, if sent for next day delivery by recognized overnight delivery service; and upon receipt, if sent by certified or registered mail, return receipt requested. This Agreement shall be governed by the laws of the State of California without regard to its conflict of laws provisions.
ANY VIRUSES OR MALICIOUS CODE TRANSMITTED TO OR THROUGH THE SERVICES BY ANY THIRD PARTY;
ANY ACT, OMISSION, ERROR, OR NEGLIGENCE OF ANY THIRD PARTIES;
ANY CONTENT WHETHER SUBMITTED BY A CONTRIBUTOR OR HIVEMAPPER, INCLUDING YOUR USE OF CONTENT; AND/OR
THE REMOVAL OR UNAVAILABILITY OF ANY CONTENT.

Last Updated: January 6, 2025
These Terms and Conditions of Sale (the “Terms”) apply to all offers and sales by Hivemapper, Inc. (“Hivemapper”, “we”, “us”, “our”)) of goods and services purchased by you (“Goods” and “Services”, respectively). All access and use of the Service and Goods is subject to the terms and conditions contained in these Terms (as amended from time to time, these “Terms”). By accessing, browsing, or otherwise using or purchasing the Goods, or interacting with any other aspect of the Service, you acknowledge that you have read, understood, and agree to be bound by these Terms of Service. If you are entering into these Terms on behalf of a company, business or other legal entity, you represent that you have the authority to bind such entity and its affiliates to these Terms, in which case the terms “you” or “your” shall refer to such entity and its affiliates. If you do not have such authority, or if you do not agree with these Terms, you must not accept these Terms and may not use the Service or should not purchase our Goods. If you do not accept the terms and conditions of these Terms, you will not access, browse, or otherwise use the Service or our Goods.
IF YOU ARE ENTERING INTO THESE TERMS OF SERVICE AS AN INDIVIDUAL: PLEASE READ THESE TERMS OF SERVICE CAREFULLY, AS THEY CONTAIN AN AGREEMENT TO ARBITRATE AND OTHER IMPORTANT INFORMATION REGARDING YOUR LEGAL RIGHTS, REMEDIES, AND OBLIGATIONS. THE AGREEMENT TO ARBITRATE REQUIRES (WITH LIMITED EXCEPTION) THAT YOU SUBMIT CLAIMS YOU HAVE AGAINST US TO BINDING AND FINAL ARBITRATION, AND FURTHER (1) YOU WILL ONLY BE PERMITTED TO PURSUE CLAIMS AGAINST HIVEMAPPER ON AN INDIVIDUAL BASIS, NOT AS A PLAINTIFF OR CLASS MEMBER IN ANY CLASS OR REPRESENTATIVE ACTION OR PROCEEDING, (2) YOU WILL ONLY BE PERMITTED TO SEEK RELIEF (INCLUDING MONETARY, INJUNCTIVE, AND DECLARATORY RELIEF) ON AN INDIVIDUAL BASIS, AND (3) YOU MAY NOT BE ABLE TO HAVE ANY CLAIMS YOU HAVE AGAINST US RESOLVED BY A JURY OR IN A COURT OF LAW.
Company will deliver the Goods within a reasonable time after Company's acceptance of your purchase order. The estimated dates set forth in any sales confirmation are merely estimates. Company will not be liable for any delay or loss or damage in transit. Company may, in its sole discretion, without liability or penalty, make partial shipments of Goods to you. Each partial shipment or performance will constitute a separate sale, and you will pay for the units shipped or services performed whether such shipment is in whole or partial fulfillment of your purchase order.
End-Users Only/Resale Prohibited: Goods sold through the website are not authorized for resale, export, or re-export. The resale of a Good without the authorization of the Company is an infringement of the Company's intellectual property rights. By submitting an order on hivemapper.com, you agree that you are not purchasing the Company's products for resale.
Descriptions: We do our best to provide accurate information on our product pages—including product descriptions, prices, shipping estimates, etc. However, we reserve the right to correct pricing errors that may inadvertently occur (which may require us to revoke an offer). Prices and availability are subject to change. Your order is subject to cancellation by us, in our sole discretion.
Order Acceptance: We reserve the right to cancel or refuse any order for any reason at any stage of the online ordering process, including after an order has been submitted and whether or not the order has been confirmed. Some situations that may result in cancellation include limitations on quantities available for purchase, inaccuracies or errors in product or pricing information, or problems identified by our credit and fraud avoidance department. We may also require additional verifications or information before accepting any order. We will attempt to contact you if all or any portion of your order is canceled, or if additional information is required to accept your order. If we do cancel your order, we will refund you any amounts that you have been charged.
Payments: When you place your order for the Good(s), you will be charged the price set forth on the Site, plus taxes, shipping, and any other governmental charges. Your placing the order constitutes your express agreement for us to charge such amounts to your provided payment method. You cannot make changes to your order after it has been placed.
Risk of Loss: All purchases of physical products are made subject to a shipping contract. Risk of loss and title for purchases pass to you upon our delivery to the carrier. You must notify us within 30 days of the date of when you received the Goods or acknowledgement if you believe any part of your purchase is missing, wrong or damaged.
Our Goods are guaranteed against manufacturing defects one (1) year from the original date of purchase. Our sole obligation in the event of such defects during this period is to repair or replace the defective part or product with a comparable part or product at our sole discretion. Except for such repair or replacement, the sale, processing or other handling of this product is without warranty, condition or other liability even though the defect or loss is caused by negligence or other fault. Damage resulting from use, accident, modification, or normal wear and tear is not covered by this or any warranty. GNSS (Global Navigation Satellite System) issues are not covered by this or any warranty. Please contact support for assistance identifying and troubleshooting potential GNSS connection problems. We assume no liability for any accident, injury, death, loss, or other claim related to or resulting from the use of this product. In no event shall we be liable for incidental or consequential damages relating to or resulting from the use of this product or any of its parts. Returns or replacements of parts and/or products may be subject to shipping, handling, replacement and/or restocking fees.
EXCEPT AS EXPRESSLY SET FORTH IN THE WARRANTY SECTION ABOVE (A) THE GOODS ARE PROVIDED WITHOUT ANY WARRANTIES OR SUPPORT OF ANY KIND, WHETHER ORAL OR WRITTEN, EXPRESS OR IMPLIED, INCLUDING ANY WARRANTY OF MERCHANTABILITY, FITNESS FOR A PARTICULAR PURPOSE, TITLE OR NON-INFRINGEMENT, AND NO OTHER REPRESENTATIONS OR CLAIMS OF ANY KIND WILL BE BINDING ON OR OBLIGATE US; (B) THE GOODS ARE EXPRESSLY PROVIDED TO YOU "AS IS"; (C) IF ANY TECHNICAL SUPPORT OR ASSISTANCE IS PROVIDED WITH RESPECT TO THE GOODS AND THE USE THEREOF, IT IS PROVIDED "AS IS", WITHOUT WARRANTIES, REPRESENTATIONS OR CONDITIONS OF ANY KIND, EXPRESS OR IMPLIED; (D) COMPANY DOES NOT WARRANT THAT THE USE OR OPERATION OF THE GOODS WILL BE UNINTERRUPTED OR ERROR FREE; AND (E) YOU BEAR ALL RISKS RELATING TO THE USE OF THE GOODS AND THE QUALITY AND PERFORMANCE OF THE GOODS AND SERVICES AND ASSUME THE ENTIRE COST OF ALL NECESSARY SERVICING, REPAIR OR CORRECTION EXCEPT IN CASES WHERE SUCH ISSUES ARE COVERED UNDER WARRANTY. THESE TERMS STATE YOUR SOLE AND EXCLUSIVE REMEDIES.
You will defend, indemnify and hold harmless Company and its officers, directors, employees, permitted successors, agents and representatives from and against any liability, claim, demand, action, suit, proceeding, loss, damage or expense (including court costs and reasonable attorneys' fees) related to misuse of the Goods or resulting from injury and/ or death of any person or damage to or loss of any property arising out of your negligence or wrongful act, error or omission.
TO THE MAXIMUM EXTENT LEGALLY PERMITTED, WHETHER OR NOT COMPANY WAS AWARE OR ADVISED OF THE POSSIBILITY OF DAMAGES, AND WHETHER OR NOT THE LIMITED REMEDIES PROVIDED HEREIN FAIL OF THEIR ESSENTIAL PURPOSE: (A) COMPANY'S AGGREGATE LIABILITY (WHETHER BASED ON WARRANTY, CONTRACT, TORT, INCLUDING NEGLIGENCE, OR ANY OTHER LEGAL THEORY) WILL IN NO CIRCUMSTANCES EXCEED THE COST OF THE GOODS AND SERVICES YOU ORDERED THAT IS RELATED TO YOUR DAMAGES; AND (B) IN NO EVENT WILL COMPANY BE LIABLE FOR SPECIAL, INCIDENTAL, INDIRECT, OR CONSEQUENTIAL DAMAGES, LOST PROFITS, LOST REVENUE, OR COST OF COVER, OR DAMAGES RESULTING FROM LOST DATA (WHETHER BASED ON WARRANTY, CONTRACT, TORT, INCLUDING NEGLIGENCE, OR ANY OTHER LEGAL THEORY). SOME STATES, COUNTRIES AND PROVINCES DO NOT ALLOW CERTAIN EXCLUSIONS OR LIMITATIONS OF LIABILITY, SO THE ABOVE LIMITATION OR EXCLUSION MAY NOT APPLY TO YOU.
SOME JURISDICTIONS DO NOT ALLOW THE DISCLAIMER OR EXCLUSION OF CERTAIN WARRANTIES OR THE LIMITATION OR EXCLUSION OF LIABILITY FOR INCIDENTAL OR CONSEQUENTIAL DAMAGES. ACCORDINGLY, SOME OF THE ABOVE LIMITATIONS SET FORTH ABOVE MAY NOT APPLY TO YOU OR BE ENFORCEABLE WITH RESPECT TO YOU. IF YOU ARE DISSATISFIED WITH ANY PORTION OF THE SERVICE OR WITH THESE TERMS OF SERVICE, YOUR SOLE AND EXCLUSIVE REMEDY IS TO DISCONTINUE USE OF THE SERVICE.
IF YOU ARE A USER FROM NEW JERSEY, THE FOREGOING SECTIONS TITLED "DISCLAIMER OF WARRANTIES" AND "LIMITATION OF LIABILITY" ARE INTENDED TO BE ONLY AS BROAD AS IS PERMITTED UNDER THE LAWS OF THE STATE OF NEW JERSEY. IF ANY PORTION OF THESE SECTIONS IS HELD TO BE INVALID UNDER THE LAWS OF THE STATE OF NEW JERSEY, THE INVALIDITY OF SUCH PORTION WILL NOT AFFECT THE VALIDITY OF THE REMAINING PORTIONS OF THE APPLICABLE SECTIONS.
Please contact [email protected] to request a return. There are a few important things to keep in mind when returning a product you purchased online from Hivemapper:
(a) You can indicate your intent to return within 14 days of receiving your product. You have a further 14 days after indicating your intent to return to then return your products or arrange for their collection.
(b) Only items that have been purchased directly from Hivemapper can be returned to Hivemapper. Hivemapper products purchased through other retailers must be returned in accordance with their respective returns and refunds policy.
(c) You are responsible for the shipping and VAT/duties (if applicable) costs.
(d) Please ensure that the item you're returning is repackaged with all the cords, adapters and documentation that were included when you received it.
(e) There will be a restocking fee of $50 per unit returned.
Once we receive your item and review the condition of the product, a refund will be initiated minus the shipping cost and restocking fee. The way your refund is processed depends on your original payment method.
Subject to the terms and conditions of these Terms, to the extent any Company software is embedded in the Goods as delivered by Company to you hereunder, such software may contain or be provided together with open source software. Each item of open source software is subject to own license terms, which can be found at: https://bit.ly/3umnVhp. If required by any license for particular open source software, Company makes such open source software, and Company's modifications to that open source software (if any), available by written request to [email protected]. Copyrights to the open source software are held by the respective copyright holders indicated therein
You are solely responsible for all code, video, images, information, data, text, software, music, sound, photographs, graphics, messages, and other materials ("content") that you make available to Hivemapper, including by uploading, posting, publishing, or displaying (hereinafter, "upload(ing)") via the Service or Goods or by emailing or otherwise making available to other users of the Service (collectively, "User Content"). The following are examples of the kinds of content and/or uses that are illegal or prohibited by Hivemapper. Hivemapper reserves the right to investigate and take appropriate legal action against anyone who, in Hivemapper's sole discretion, violates this provision, including removing the offending content from the Service, suspending or terminating the account of such violators, and reporting the violator to law enforcement authorities. You agree to not use the Service to:
a) email or otherwise upload any content that (i) infringes any intellectual property or other proprietary rights of any party; (ii) you do not have a right to upload under any law or under contractual or fiduciary relationships; (iii) contains software viruses or any other computer code, files or programs designed to interrupt, destroy, or limit the functionality of any computer software or hardware or telecommunications equipment; (iv) poses or creates a privacy or security risk to any person; (v) constitutes unsolicited or unauthorized advertising, promotional materials, commercial activities and/or sales, "junk mail," "spam," "chain letters," "pyramid schemes," "contests," "sweepstakes," or any other form of solicitation; (vi) is unlawful, harmful, threatening, abusive, harassing, tortious, excessively violent, defamatory, vulgar, obscene, pornographic, libelous, invasive of another's privacy, hateful, discriminatory, or otherwise objectionable; or (vii) in the sole judgment of Hivemapper, is objectionable or which restricts or inhibits any other person from using or enjoying the Service, or which may expose Hivemapper or its users to any harm or liability of any type;
b) interfere with or disrupt the Service or Goods or servers or networks connected to the Service, or disobey any requirements, procedures, policies, or regulations of networks connected to the Service;
c) violate any applicable local, state, national, or international law, or any regulations having the force of law;
d) impersonate any person or entity, or falsely state or otherwise misrepresent your affiliation with a person or entity;
e) solicit personal information from anyone under the age of 18;
f) harvest or collect email addresses or other contact information of other users from the Service by electronic or other means for the purposes of sending unsolicited emails or other unsolicited communications;
g) advertise or offer to sell or buy any goods or services for any business purpose that is not specifically authorized;
h) further or promote any criminal activity or enterprise or provide instructional information about illegal activities;
i) use the Goods in violation of any applicable privacy laws;
j) obtain or attempt to access or otherwise obtain any content or information through any means not intentionally made available or provided for through the Service or the Goods;
k) circumvent, remove, alter, deactivate, degrade, or thwart any of the content protections in or geographic restrictions on any content (including Service Content (as defined below)) available on or through the Service, including through the use of virtual private networks; or
l) engage in or use any data mining, robots, scraping, or similar data gathering or extraction methods. If you are blocked by Hivemapper from accessing the Goods or Service (including by blocking your IP address), you agree not to implement any measures to circumvent such blocking (e.g., by masking your IP address or using a proxy IP address or virtual private network).
You will comply with all applicable laws, regulations and ordinances and maintain in effect all the licenses, permissions, authorizations, consents and permits that you need to carry out your obligations under this Agreement. You will comply with all export and import laws of all countries involved in the sale of the Goods and Services under these Terms, including the U.S. Export Administration Regulations and the trade and economic sanctions maintained by the U.S. Department of the Treasury's Office of Foreign Assets Control. You assume all responsibility for shipments of Goods or performance of any Services requiring any government import clearance. Company may terminate these Terms if any governmental authority imposes antidumping or countervailing duties or any other penalties on the Goods or Services. By ordering the Goods or using the Service, you represent and warrant that: (i) you are not located in a country or territory that is subject to a U.S. Government export embargo, or that has been sanctioned by the Office of Foreign Assets Control, (ii) you are not listed on any U.S. Government list of prohibited or restricted parties, and (iii) you will not use the Goods or Services for any prohibited end use, including for activities related to nuclear proliferation, chemical or biological weapons, missile proliferation, military end use, or military-intelligence end use. You agree not to resell, export, re-export, release, or transfer the Goods or Services, whether directly or indirectly, to any end-user or to any country, other that the end-user and destination country identified on the purchase order.
Read Carefully
PLEASE READ THIS SECTION CAREFULLY AS IT AFFECTS YOUR RIGHTS.
A. Agreement to Arbitrate
This Dispute Resolution by Binding Arbitration section is referred to in these Terms of Service as the "Arbitration Agreement." If you are entering into these Terms of Service as an individual (as opposed to on behalf of an entity), you agree that any and all disputes or claims that have arisen or may arise between you and Hivemapper, whether arising out of or relating to these Terms of Service (including any alleged breach thereof), the Service, any advertising, or any aspect of the relationship or transactions between us, will be resolved exclusively through final and binding arbitration, rather than a court, in accordance with the terms of this Arbitration Agreement, except that you may assert individual claims in small claims court, if your claims qualify. Further, this Arbitration Agreement does not preclude you from bringing issues to the attention of federal, state, or local agencies, and such agencies can, if the law allows, seek relief against us on your behalf. You agree that, by entering into these Terms of Service, you and Hivemapper are each waiving the right to a trial by jury or to participate in a class action. Your rights will be determined by a neutral arbitrator, not a judge or jury.
B. Prohibition of Class and Representative Actions and Non-Individualized Relief
YOU AND HIVEMAPPER AGREE THAT EACH OF US MAY BRING CLAIMS AGAINST THE OTHER ONLY ON AN INDIVIDUAL BASIS AND NOT AS A PLAINTIFF OR CLASS MEMBER IN ANY PURPORTED CLASS OR REPRESENTATIVE ACTION OR PROCEEDING. UNLESS BOTH YOU AND HIVEMAPPER AGREE OTHERWISE, THE ARBITRATOR MAY NOT CONSOLIDATE OR JOIN MORE THAN ONE PERSON'S OR PARTY'S CLAIMS AND MAY NOT OTHERWISE PRESIDE OVER ANY FORM OF A CONSOLIDATED, REPRESENTATIVE, OR CLASS PROCEEDING. ALSO, THE ARBITRATOR MAY AWARD RELIEF (INCLUDING MONETARY, INJUNCTIVE, AND DECLARATORY RELIEF) ONLY IN FAVOR OF THE INDIVIDUAL PARTY SEEKING RELIEF AND ONLY TO THE EXTENT NECESSARY TO PROVIDE RELIEF NECESSITATED BY THAT PARTY'S INDIVIDUAL CLAIM(S), EXCEPT THAT YOU MAY PURSUE A CLAIM FOR AND THE ARBITRATOR MAY AWARD PUBLIC INJUNCTIVE RELIEF UNDER APPLICABLE LAW TO THE EXTENT REQUIRED FOR THE ENFORCEABILITY OF THIS PROVISION.
C. Pre-Arbitration Dispute Resolution
Hivemapper is always interested in resolving disputes amicably and efficiently, and most customer concerns can be resolved quickly and to the customer's satisfaction by emailing customer support at [email protected]. If such efforts prove unsuccessful, a party who intends to seek arbitration must first send to the other, by certified mail, a written Notice of Dispute ("Notice"). The Notice to Hivemapper should be sent to 101 2nd Street Suite 1200 San Francisco, CA 94105 ("Notice Address"). The Notice must (i) describe the nature and basis of the claim or dispute and (ii) set forth the specific relief sought. If Hivemapper and you do not resolve the claim within sixty (60) calendar days after the Notice is received, you or Hivemapper may commence an arbitration proceeding. During the arbitration, the amount of any settlement offer made by Hivemapper or you will not be disclosed to the arbitrator until after the arbitrator determines the amount, if any, to which you or Hivemapper is entitled.
D. Arbitration Procedures
Arbitration will be conducted by a neutral arbitrator in accordance with the American Arbitration Association's ("AAA") rules and procedures, including the AAA's Consumer Arbitration Rules (collectively, the "AAA Rules"), as modified by this Arbitration Agreement. For information on the AAA, please visit its website, http://www.adr.org. Information about the AAA Rules and fees for consumer disputes can be found at the AAA's consumer arbitration page, https://www.adr.org/consumer. If there is any inconsistency between any term of the AAA Rules and any term of this Arbitration Agreement, the applicable terms of this Arbitration Agreement will control unless the arbitrator determines that the application of the inconsistent Arbitration Agreement terms would not result in a fundamentally fair arbitration. The arbitrator must also follow the provisions of these Terms of Service as a court would. All issues are for the arbitrator to decide, including issues relating to the scope, enforceability, and arbitrability of this Arbitration Agreement. Although arbitration proceedings are usually simpler and more streamlined than trials and other judicial proceedings, the arbitrator can award the same damages and relief on an individual basis that a court can award to an individual under these Terms of Service and applicable law. Decisions by the arbitrator are enforceable in court and may be overturned by a court only for very limited reasons.
Unless Hivemapper and you agree otherwise, any arbitration hearings will take place in a reasonably convenient location for both parties with due consideration of their ability to travel and other pertinent circumstances. If the parties are unable to agree on a location, the determination will be made by AAA. If your claim is for $10,000 or less, Hivemapper agrees that you may choose whether the arbitration will be conducted solely on the basis of documents submitted to the arbitrator, through a telephonic hearing, or by an in-person hearing as established by the AAA Rules. If your claim exceeds $10,000, the right to a hearing will be determined by the AAA Rules. Regardless of the manner in which the arbitration is conducted, the arbitrator will issue a reasoned written decision sufficient to explain the essential findings and conclusions on which the award is based.
E. Costs of Arbitration
Payment of all filing, administration, and arbitrator fees (collectively, the "Arbitration Fees") will be governed by the AAA Rules, unless otherwise provided in this Arbitration Agreement. If the value of the relief sought is $75,000 or less, at your request, Hivemapper will pay all Arbitration Fees. If the value of relief sought is more than $75,000 and you are able to demonstrate to the arbitrator that you are economically unable to pay your portion of the Arbitration Fees or if the arbitrator otherwise determines for any reason that you should not be required to pay your portion of the Arbitration Fees, Hivemapper will pay your portion of such fees. In addition, if you demonstrate to the arbitrator that the costs of arbitration will be prohibitive as compared to the costs of litigation, Hivemapper will pay as much of the Arbitration Fees as the arbitrator deems necessary to prevent the arbitration from being cost-prohibitive. Any payment of attorneys' fees will be governed by the AAA Rules.
F. Confidentiality
All aspects of the arbitration proceeding, and any ruling, decision, or award by the arbitrator, will be strictly confidential for the benefit of all parties.
G. Severability
If a court or the arbitrator decides that any term or provision of this Arbitration Agreement (other than the subsection (b) above titled "Prohibition of Class and Representative Actions and Non-Individualized Relief" above) is invalid or unenforceable, the parties agree to replace such term or provision with a term or provision that is valid and enforceable and that comes closest to expressing the intention of the invalid or unenforceable term or provision, and this Arbitration Agreement will be enforceable as so modified. If a court or the arbitrator decides that any of the provisions of subsection (b) above titled "Prohibition of Class and Representative Actions and Non-Individualized Relief" are invalid or unenforceable, then the entirety of this Arbitration Agreement will be null and void, unless such provisions are deemed to be invalid or unenforceable solely with respect to claims for public injunctive relief. The remainder of these Terms of Service will continue to apply.
H. Future Changes to Arbitration Agreement
Notwithstanding any provision in these Terms of Service to the contrary, Hivemapper agrees that if it makes any future change to this Arbitration Agreement (other than a change to the Notice Address) while you are a user of the Service, you may reject any such change by sending Hivemapper written notice within thirty (30) calendar days of the change to the Notice Address provided above. By rejecting any future change, you are agreeing that you will arbitrate any dispute between us in accordance with the language of this Arbitration Agreement as of the date you first accepted these Terms of Service (or accepted any subsequent changes to these Terms of Service).
You and Hivemapper intend that these Terms of Service are to be construed and enforced in accordance with the laws of the State of New York without regard to any conflict-of-law or choice-of-law rules, and that the rule of construction that provides that a document is construed against the maker thereof be inapplicable in the construction of any of the terms of these Terms of Service. Any dispute, claim, or controversy arising out of or relating in any way to these Terms of Service or the breach, termination, enforcement, interpretation, or validity thereof, including the determination of the scope or applicability of this agreement to arbitrate, shall be determined through confidential binding arbitration in New York, New York before one arbitrator. The confidential binding arbitration shall be administered by AAA pursuant to its Commercial Arbitration Rules, and you and Hivemapper shall maintain the confidential nature of the arbitration proceeding and the award, including the hearing. Judgment on the award may be entered in any court having jurisdiction.
Company will have no liability under these Terms for Company's failure or delay in performing any of the obligations imposed by the Terms to the extent such failure or delay is the result of any event beyond Company's control. In the event that any provision of these Terms are found to be unenforceable, such provision will be reformed only to the extent necessary to make it enforceable, and the remainder will continue in effect, to the extent consistent with the intent of the parties as of the effective date of this Agreement. These Terms will be governed by the laws of the State of California without regard to its conflict of law provisions. With respect to any disputes or claims not subject to arbitration, as set forth above, you and Hivemapper submit to the personal and exclusive jurisdiction of the state and federal courts located within county of San Francisco, California. Nothing in these Terms will be construed to place the parties hereto in an agency, employment, franchise, joint venture, or partnership relationship. Neither party will have the authority to obligate or bind the other in any manner, and nothing herein contained will give rise or is intended to give rise to any rights of any kind to any third parties. Neither party will represent to the contrary, either expressly, implicitly or otherwise. You may not assign or transfer these Terms in whole or in part, without the prior written consent of Company. Any attempted assignment, delegation or transfer by you in violation hereof will be null and void. Subject to the foregoing, these Terms will be binding on the parties and their successors and assigns. Failure by either party to enforce any provision of these Terms will not be deemed a waiver of future enforcement of that or any other provision. The headings and captions used in these Terms are used for convenience only and are not to be considered in construing or interpreting these Terms. These Terms constitute the entire agreement between the parties with respect to the subject matter hereof. It supersedes and replaces all prior or contemporaneous understandings or agreements, written or oral, regarding such subject matter, and prevails over any conflicting terms or conditions contained on printed forms submitted with purchase orders, sales acknowledgments or quotations.
Please contact us at [email protected] to report any violations of these Terms of Service or to pose any questions regarding these Terms.
Once your Bee is assembled, pair it with the Bee Maps app and confirm it’s connected.
/
/
-
After confirming your Bee is connected, you’re ready to .
Query imagery contained by a GeoJSON (Multi)Polygon for a given week
YYYY-mm-dd of a day in the week to query
2023-10-31Polygon or MultiPolygon
PolygonSuccessful operation
Invalid GeoJSON Polygon/MultiPolygon
Forbidden (couldn't extract valid API key)
Paginated API transactions
{
  "frames": [
    {
      "url": "https://www.cdn.com/image?signed=yoursdearly",
      "timestamp": "2023-11-09T02:30:48.974Z",
      "sequence": "60cb39e7cce2931a8cd2fa2d",
      "idx": 0,
      "device": "hdc",
      "position": {
        "lat": 37.76910370072376,
        "lat_ref": "n",
        "lon": -122.48185591741223,
        "lon_ref": "e",
        "gdop": 0.123,
        "hdop": 0.123,
        "pdop": 0.123,
        "eph": 0.123
      },
      "width": 2028,
      "height": 1024,
      "imu": {
        "acc_x": 0.123,
        "acc_y": 0.123,
        "acc_z": 0.123,
        "gyro_x": 0.123,
        "gyro_y": 0.123,
        "gyro_z": 0.123
      }
    }
  ],
  "creditsUsed": 42,
  "creditsRemaining": 1000000
}{
"balance": 42
}{
"history": [
{
"area": 101.123,
"credits": 4,
"payload": {
"type": "Polygon",
"coordinates": [
[
[
-122.48185591741223,
37.76910370072376
]
]
]
},
"timestamp": "2023-11-09T03:09:40.131Z",
"weeks": [
"2023-10-31"
]
}
]
}const url = 'https://hivemapper.com/api/developer/imagery/poly'
const resp = await fetch(url,
{
method: 'post',
body: JSON.stringify({
coordinates: [
[
[-122.41927011115149,37.775414437036275],
[-122.41605628337065,37.7763 86631642566],
[-122.41597692959819,37.77889546188183],
[-122.42299973845249,37.7772647319 11615],
[-122.41927011115149,37.775414437036275]
]
],
type: 'Polygon'
}),
headers: {
'content-type': 'application/json',
authorization: 'Basic XXXYYYZZZ'
}
});
const data = await resp.json();
const frames = data.frames;
GET /api/developer/devices HTTP/1.1
Host: hivemapper.com
Accept: */*
{
  "device": {
    "focal": 0.1,
    "k1": 0.2,
    "k2": 0.3
  }
}GET /api/developer/balance HTTP/1.1
Host: hivemapper.com
Authorization: Basic username:password
Accept: */*
GET /api/developer/history HTTP/1.1
Host: hivemapper.com
Authorization: Basic username:password
Accept: */*


